LESSON 15 Part 1
TRANSPORT A CASUALTY
Transport a casualty using appropriate one-man, two-man or litter carries.
CONDITIONS
Given a simulated casualty and an assistant.
STANDARD
Score a GO on the performance checklists.
REFERENCES
STP 21-1-SMCT, Soldier's Manual of Common Tasks: Skill Level 1.
FM 21-11, First Aid for Soldiers.
FM 8-10-6, Medical Evacuation in a Theater of Operation.
SECTION I. GENERAL
15-1. INTRODUCTION
A soldier who is injured or ill needs to be evaluated by medical personnel. Medical personnel may not be available at a given location and the soldier must be transported to a medical treatment facility (usually an aid station). A soldier who is not seriously injured or ill may be able to walk to the medical treatment facility. At other times, the casualty's condition or the military situation may prevent him from reaching a medical facility on his own. Sometimes a vehicle (tracked ambulance, etc.) can reach the soldier and transport him to the aid station. At other times, he must be carried (litter, two-man carry, or one-man carry) to the aid station or to a casualty collection point (CCP) where an evacuation vehicle can pick him up and transport him to the aid station.
Manual carries must be performed correctly in order to prevent further injury to the casualty and to prevent injury to the rescuer. One-man and two-man manual carries are used to move a casualty when the time or materials needed to make a litter are not available and/or other personnel are not available to assist you in moving the casualty. In general, a casualty should not be moved before the required emergency care is given unless it is necessary to move him and yourself from a dangerous situation (enemy fire, burning building, etc.). This lesson gives instructions for transporting such a casualty.
15-2. CHOOSE THE APPROPRIATE METHOD TO MOVE A CASUALTY ON THE BATTLEFIELD
If a casualty is to be moved (evacuated), you must decide which method is appropriate. Follow the general rules given below.
Choose an appropriate carry based on the casualty's condition, the nature of the casualty's injury, the military situation, the distance to be covered, the weight of the casualty, your strength and endurance, and obstacles that will be encountered.
Do not move a casualty with a suspected fracture of the spine unless there is an immediate, life-threatening danger, such as a fire. If the casualty must be moved, use a backboard if available.
If possible, use a vehicle to transport the casualty.
If the casualty is to be carried, use a standard litter if one can be obtained and if two or more litter bearers (including yourself, if applicable) are available. A litter allows a casualty to be moved a greater distance than do manual carries. Also, a casualty is less likely to aggravate existing injuries or suffer additional injuries if a litter is used.
If a standard litter is not available and if the time, materials, and litter bearers are available, construct and use an improvised litter. A door, ladder, cot, bench, chair, or similar objects can be used as an improvised litter.
If a litter cannot be used (insufficient time and/or insufficient materials available) and another person is available to help carry the casualty, use an appropriate two-man manual carry to transport the casualty.
If no other help is available, use an appropriate one-man carry to transport the casualty.
SECTION II. ONE-MAN CARRIES
15-3. TYPES OF ONE-MAN CARRIES
a. Fireman's Carry
The fireman's carry is usually used to quickly move an unconscious or disabled casualty for a moderate or long distance. This carry leaves one of the bearer's arms free to carry a rifle, move around obstacles, etc.
b. Support Carry
The support carry is only used with a conscious casualty who can walk or at least hop on one leg. The carry can be used for a long distance if the casualty does not tire.
c. Arms Carry
The arms carry is generally used to move a conscious or unconscious casualty for a short distance.
d. Saddleback Carry
The saddleback carry is only used for a conscious casualty who can put one or both of his arms around your neck. It is generally used to carry a casualty for a moderate or long distance.
e. Pack-Strap Carry
The pack-strap carry is generally used to carry a conscious or unconscious casualty for a moderate distance. This carry is not used if the casualty has a broken arm or wrist.
f. Pistol-Belt Carry
The pistol-belt carry is generally used to carry a conscious or unconscious casualty for a long distance. It is the preferred carry if you must use your rifle, climb banks, or move over obstacles since the carry leaves both of your hands free.
g. Pistol-Belt Drag
The pistol-belt drag is generally used to move a conscious or unconscious casualty for a short distance. This carry is primarily used when the rescuer must keep very close to the ground.
h. Neck Drag
The neck drag is generally used to move a conscious or unconscious casualty for a short distance. This carry allows the rescuer to stay close to the ground, but not as close as the pistol-belt drag. The carry can be used when moving behind a low wall, under a vehicle, or through a culvert. The neck drag is not used if the casualty has a broken arm or wrist.
i. Cradle Drop Drag
The cradle drop drag is generally used to move a conscious or unconscious casualty up or down steps or to quickly move a casualty from a life-threatening situation (fire, etc.).
15-4. TURNING OR POSITIONING A CASUALTY
Some carries require the casualty to be lying prone (on his abdomen); others require him to be lying supine (on his back). To turn the casualty either to the prone or supine position, follow these steps.
Kneel at the casualty's uninjured side.
WARNING
If you are in a chemical environment, squat--do not kneel.
Place the casualty's arms above his head and cross his far ankle over the near one.
Grasp the casualty's clothing at his far shoulder and hip and gently pull so the casualty rolls toward you. Continue until the casualty is on his abdomen or back.
Place the casualty's arms at his sides and straighten his legs.
15-5. MOVING A CASUALTY TO THE STANDING POSITION
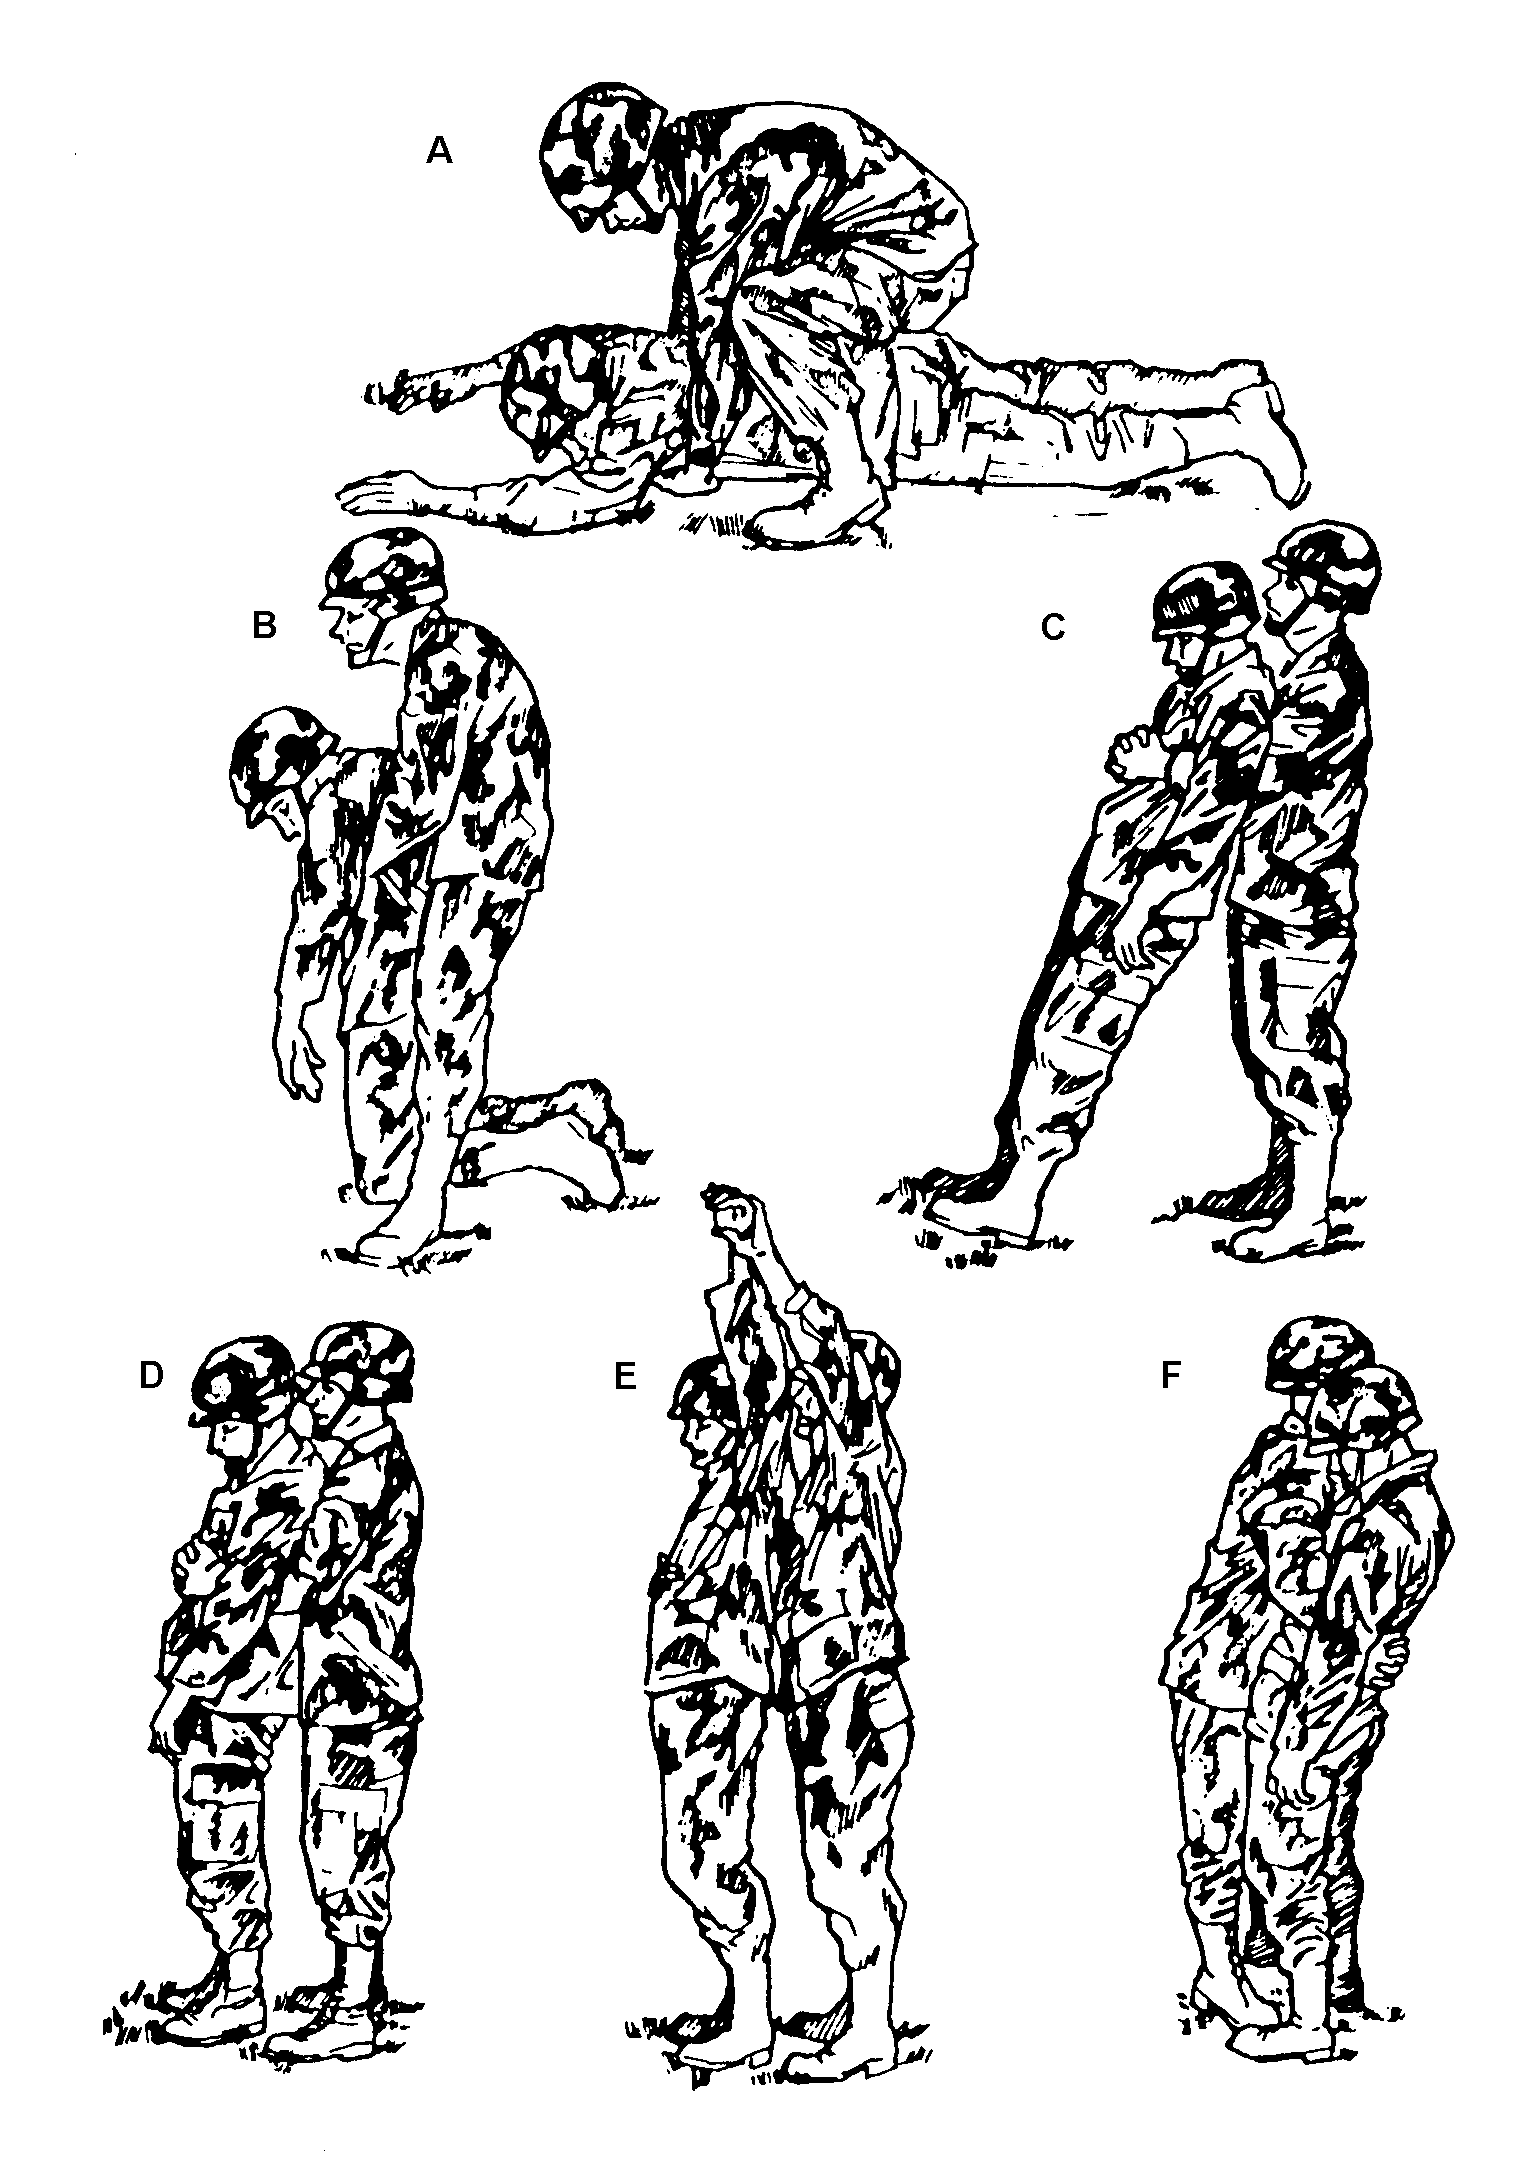
Some one-man carries require that the casualty be moved to a standing position. If the casualty is conscious, you may be able to assist him to stand up. If the casualty is unconscious, however, you need to raise him to a standing position without his help. Two methods of moving the casualty from a prone position are presented. The second (alternate) method is used if you believe the method will be safer for the casualty due to the location of his injuries.
a. Regular Method
Position the casualty in a prone position.
Straddle the casualty, slip your hands under his chest, and lock your hands together.
Lift the casualty and begin walking backwards until he is on his knees.

FIGURE 15-1. MOVING A CASUALTY TO HIS FEET (REGULAR METHOD)
Continue walking backward until his legs are straight and his knees are locked.
Walk forward and bring the casualty to a standing position. Keep the casualty tilted slightly backward so his knees will remain locked. If his knees do not remain locked, walk backward until they lock and then move forward until the casualty is in the standing position.
Grasp one of the casualty's wrists and raise his arm. Use your other arm to hold the casualty erect.
Move under the casualty's arm to his front, lower his arm, and hold the casualty around his waist.
Place your foot between the casualty's feet and spread his feet so his feet are about six to eight inches apart.
b. Alternate Method
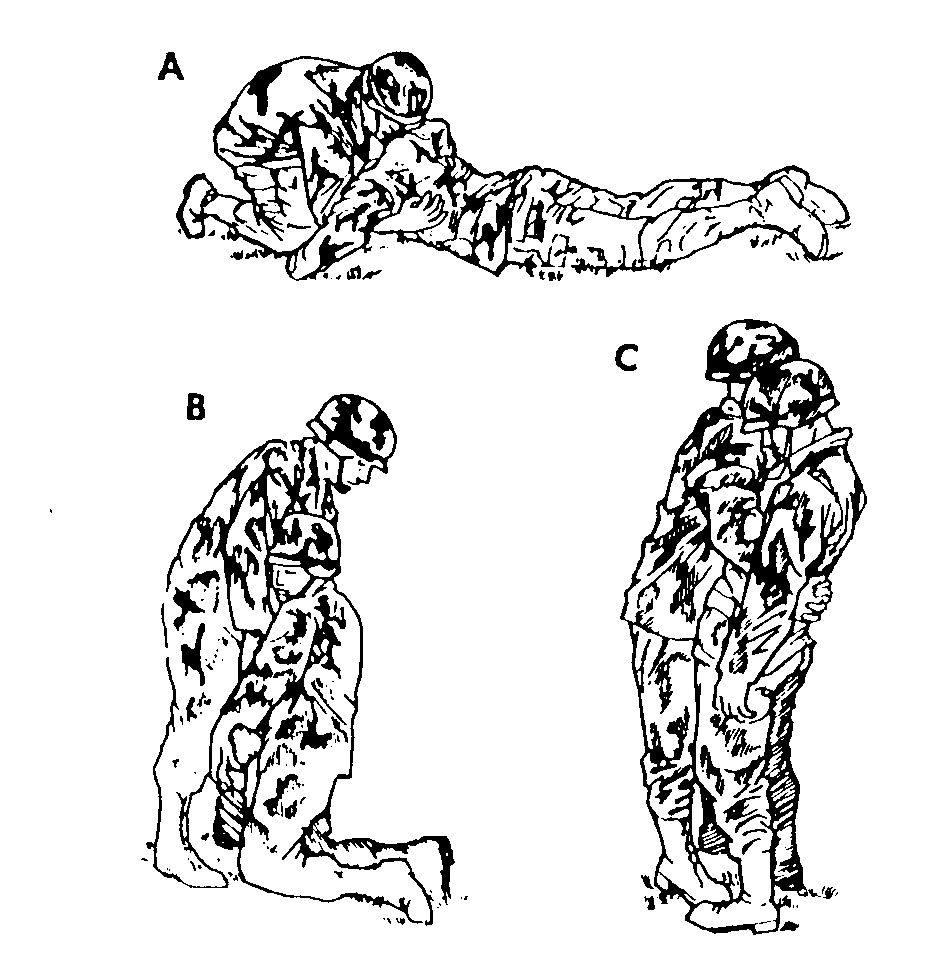
FIGURE 15-2. MOVING A CASUALTY TO HIS FEET (ALTERNATE METHOD)
Position the casualty in a prone position.
Kneel on one knee (or squat) at the casualty's head, facing his feet.
Put your hands under his armpits, down his sides, and across his back.
Rise, lifting the casualty to his knees.
CAUTION: Keep the casualty's head from snapping back.
Lower your arms, secure a hold on the casualty, and raise him to a standing position with his knees locked.
Put your arms around the casualty's waist and tilt his body slightly backward to keep his knees from buckling.
Place your foot between his feet and spread them so that his feet are six to eight inches apart.
15-6. PERFORM THE FIREMAN'S CARRY
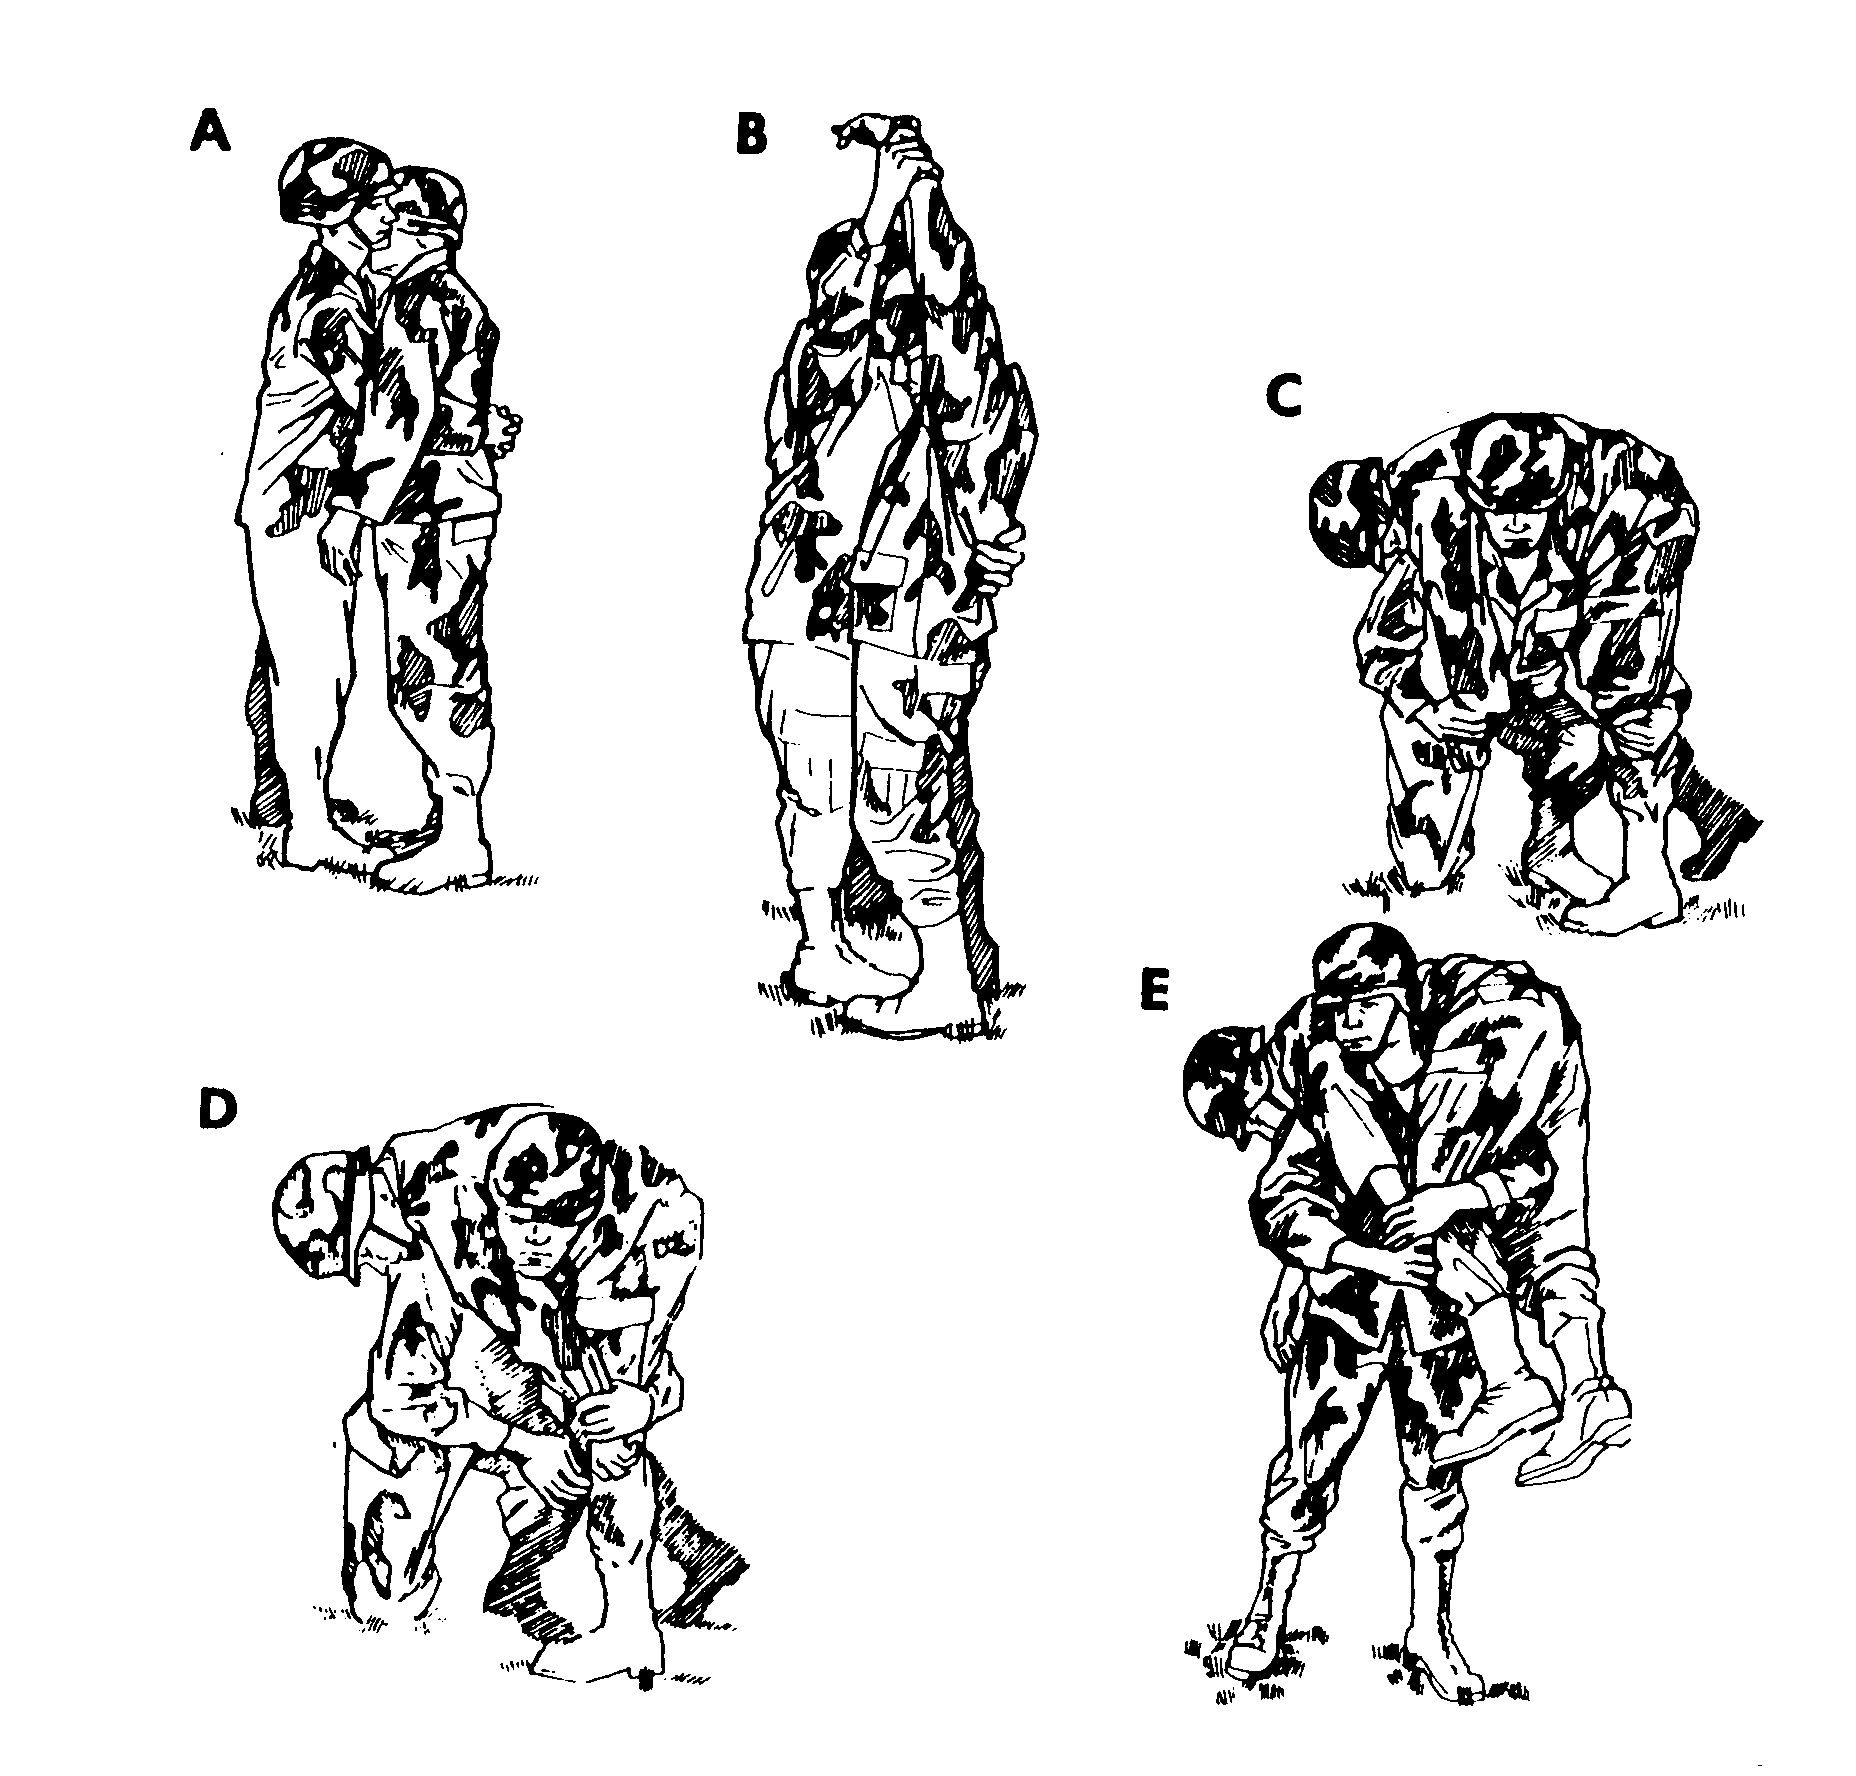
FIGURE 15-3. FIREMAN'S CARRY
Raise the casualty to a standing position.
Grasp the casualty's wrist and lift his arm over his head while continuing to support the casualty with your other arm.
CAUTION: If the casualty has an injured arm, grasp the wrist of the uninjured arm.
Bend at the waist and kneel, pulling the casualty over your shoulder. At the same time, slip your arm from his waist, pass the arm between the casualty's legs, and grasp behind the casualty's knee.
Move the hand grasping the casualty's wrist to the hand at the casualty's knee.
Grasp the casualty's wrist with the hand at the casualty's knee, freeing your other hand.
Place your free hand on your knee and slowly rise to a standing position. Use the hand on your knee to help you rise without straining your back.
Adjust the casualty's body so his weight is distributed comfortably.
Move forward, carrying the casualty.
15-7. PERFORM THE SUPPORT CARRY
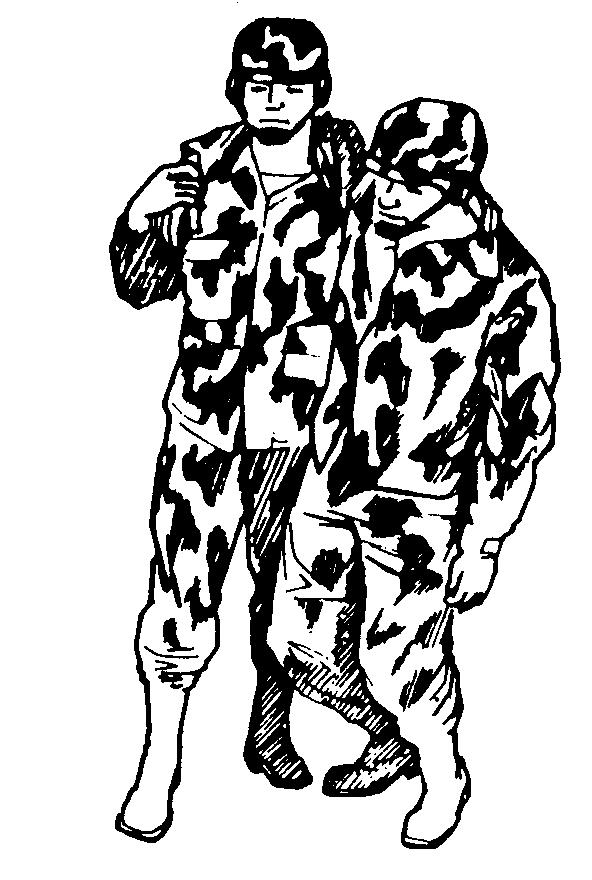
FIGURE 15-4. SUPPORT CARRY
Position the casualty in a sitting position.
Squat at the casualty's side so you are facing in the same direction as the casualty.
CAUTION: If the casualty has an injured leg, position yourself with the injured leg next to you.
Bring the casualty's near arm over your shoulder and grasp his wrist with your hand that is away from the casualty.
Put your near arm around the casualty's waist.
Stand up, helping the casualty to rise to a standing position.
[NOTE: You can also raise the casualty to a standing position using the steps given in paragraph 15-5.]
Assist the casualty to walk or hop on one leg. Adjust your walking motion as needed to help the casualty maintain his balance.
15-8. PERFORM THE ARMS CARRY
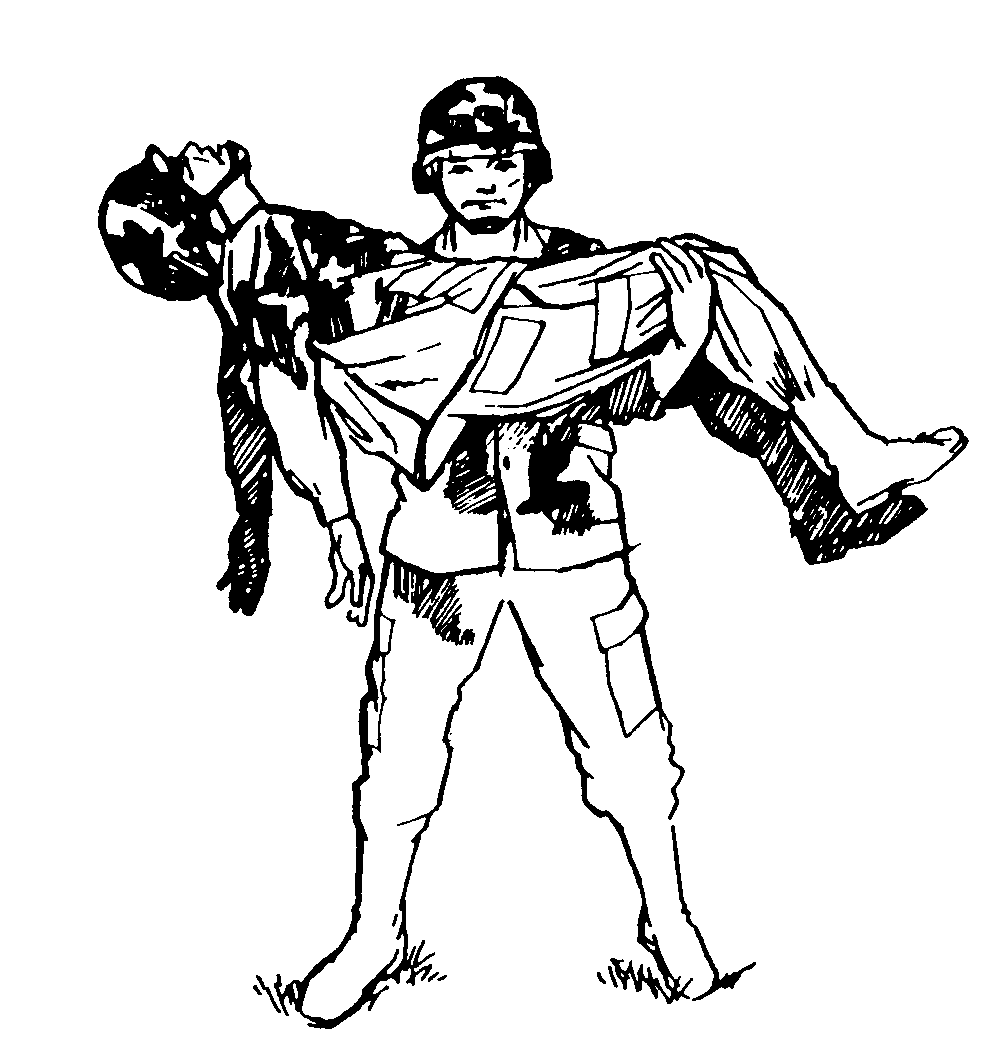
FIGURE 15-5. ARMS CARRY
Raise the casualty to a standing position.
Slide one of your arms under the casualty's arm, behind his back, and under his other arm.
Move to the casualty's side, bend down, and place your other arm behind the casualty's knees.
Lift the casualty from the ground and stand erect.
Carry the casualty high on your chest to lessen fatigue.
15-9. PERFORM THE SADDLEBACK CARRY
Raise casualty to a standing position. (Since the casualty is conscious, he may be able to rise with assistance.)
Grasp the casualty's wrist and lift his arm over his head while continuing to support the casualty with your other arm.
Turn so that your back is to his front and bring his arm over your shoulder. Support the casualty's waist with your other arm, if needed.
Have the casualty put his other arm around your neck. If possible, he should grasp one of his wrists with his other hand.
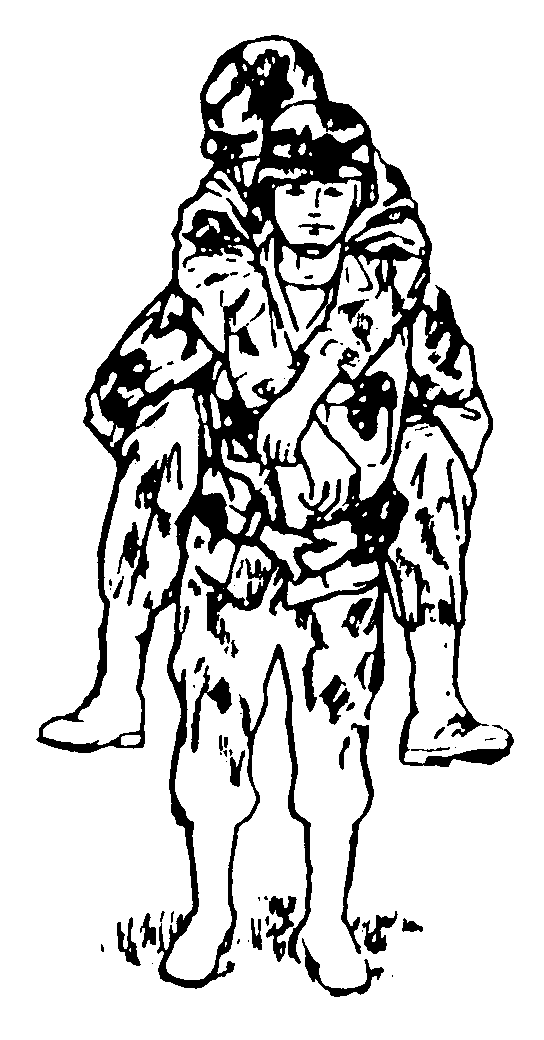
FIGURE 15-6. SADDLEBACK CARRY
Stoop and move your arms back and around the outside of the casualty's thighs.
Bring your hands around the back of his thighs; then bring them to the inside of his thighs. Continue to move your hands until they reach your sides and you have lifted the casualty's thighs.
Stand up and clasp your hands together in front of you.
Adjust the casualty's weight to make the weight distribution more comfortable and walk forward.
15-10. PERFORM THE PACK-STRAP CARRY
Raise the casualty to a standing position.
Grasp one of the casualty's wrists and lift his arm above his head while continuing to support the casualty's waist with your other arm.
Turn and bring the casualty's raised arm over your shoulder as you turn so your back is to the casualty's front. Bend your knees somewhat so your shoulder fits under his arm.
Release his waist, grasp his other wrist, and bring that arm over your other shoulder.
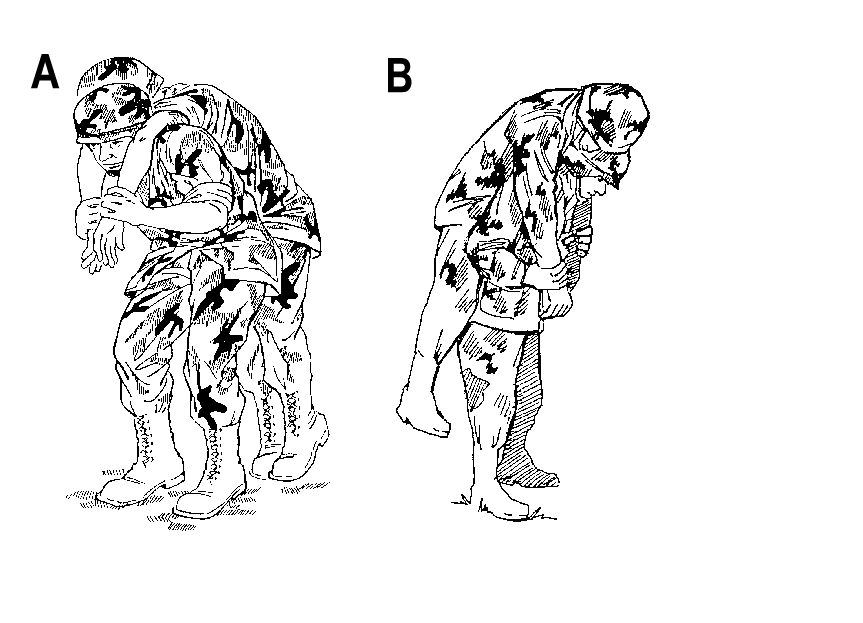
FIGURE 15-7. PACK-STRAP CARRY
CAUTION: Hold both wrists so his hands are in a palms down (palms toward your abdomen) position. Twisting the casualty's hands could result in injury to his wrists, elbows, or shoulders when he is lifted and carried.
Bend forward and hoist the casualty as high on your back as possible so his weight is resting on your back.
Walk forward, keeping bent so the casualty's weight is balanced on your back and his feet are not dragging.
15-11. PERFORM THE PISTOL-BELT CARRY
Form the sling by joining two fully-extended pistol belts together to form one large loop. If pistol belts are not available, use any material which will not break and which will not cut or bind the casualty (a rifle strap, two cravat bandages, etc.) to make the sling.
Position the casualty on his back.
Slip the sling under the casualty with the top part of the loop under his lower back, the bottom part under his thighs, the belt buckles centered behind the casualty, and a loop end extending from each side.
Move the casualty's legs apart and lie between them on your back. Thrust your arms through the loop ends. Adjust the sling so the loop ends fit over your shoulders.
Grasp the casualty's wrist and his trouser leg on his injured side.
Roll toward the casualty's uninjured side and onto your abdomen. (Both you and the casualty are now in a prone position.)
Release the casualty's wrist and leg and push yourself up until you are on your knees.
Rise to a kneeling position with your hands on your knees for support.
Rise to your feet. Lean forward to balance the casualty's weight.
Adjust the casualty's weight to a more comfortable position, if needed, and walk forward. Your hands are free to carry a rifle or other object, climb obstacles, etc.
If the casualty is unconscious and you do not have to carry anything in your hands, grasp his wrists (palms down) to help keep the casualty balanced while you are walking.
If the casualty is conscious, have him put his arms around your neck. Have him use one of his hands to grasp the wrist of the other hand.
![]() FIGURE
15-8. PISTOL-BELT CARRY
FIGURE
15-8. PISTOL-BELT CARRY
15-12. PERFORM THE PISTOL-BELT DRAG
Extend two pistol belts to their full length and join them together to make one large loop. Other materials, such as a rifle sling or two cravats, can be used if pistol belts are not available. In some cases, three pistol belts may be needed.
Position the casualty on his back.
Slip the bottom of the loop across the casualty's chest, under his armpits, and under his shoulders.
Twist the remainder of the loop to form a figure 8. The casualty is in the bottom part of the figure 8 and the top part is above his head. Adjust the loop so the buckles cross in the center of the figure 8.
Lie on your side facing the casualty with your head in the same direction as the casualty's head. Support yourself on your elbow.
Slip the arm on which you are resting through the top loop of the figure 8 and bring the loop over your shoulder (bottom shoulder).
Turn onto your abdomen. The pistol belts are now across your chest and the loop is over the shoulder farthest from the casualty.
Crawl, dragging the casualty with you.
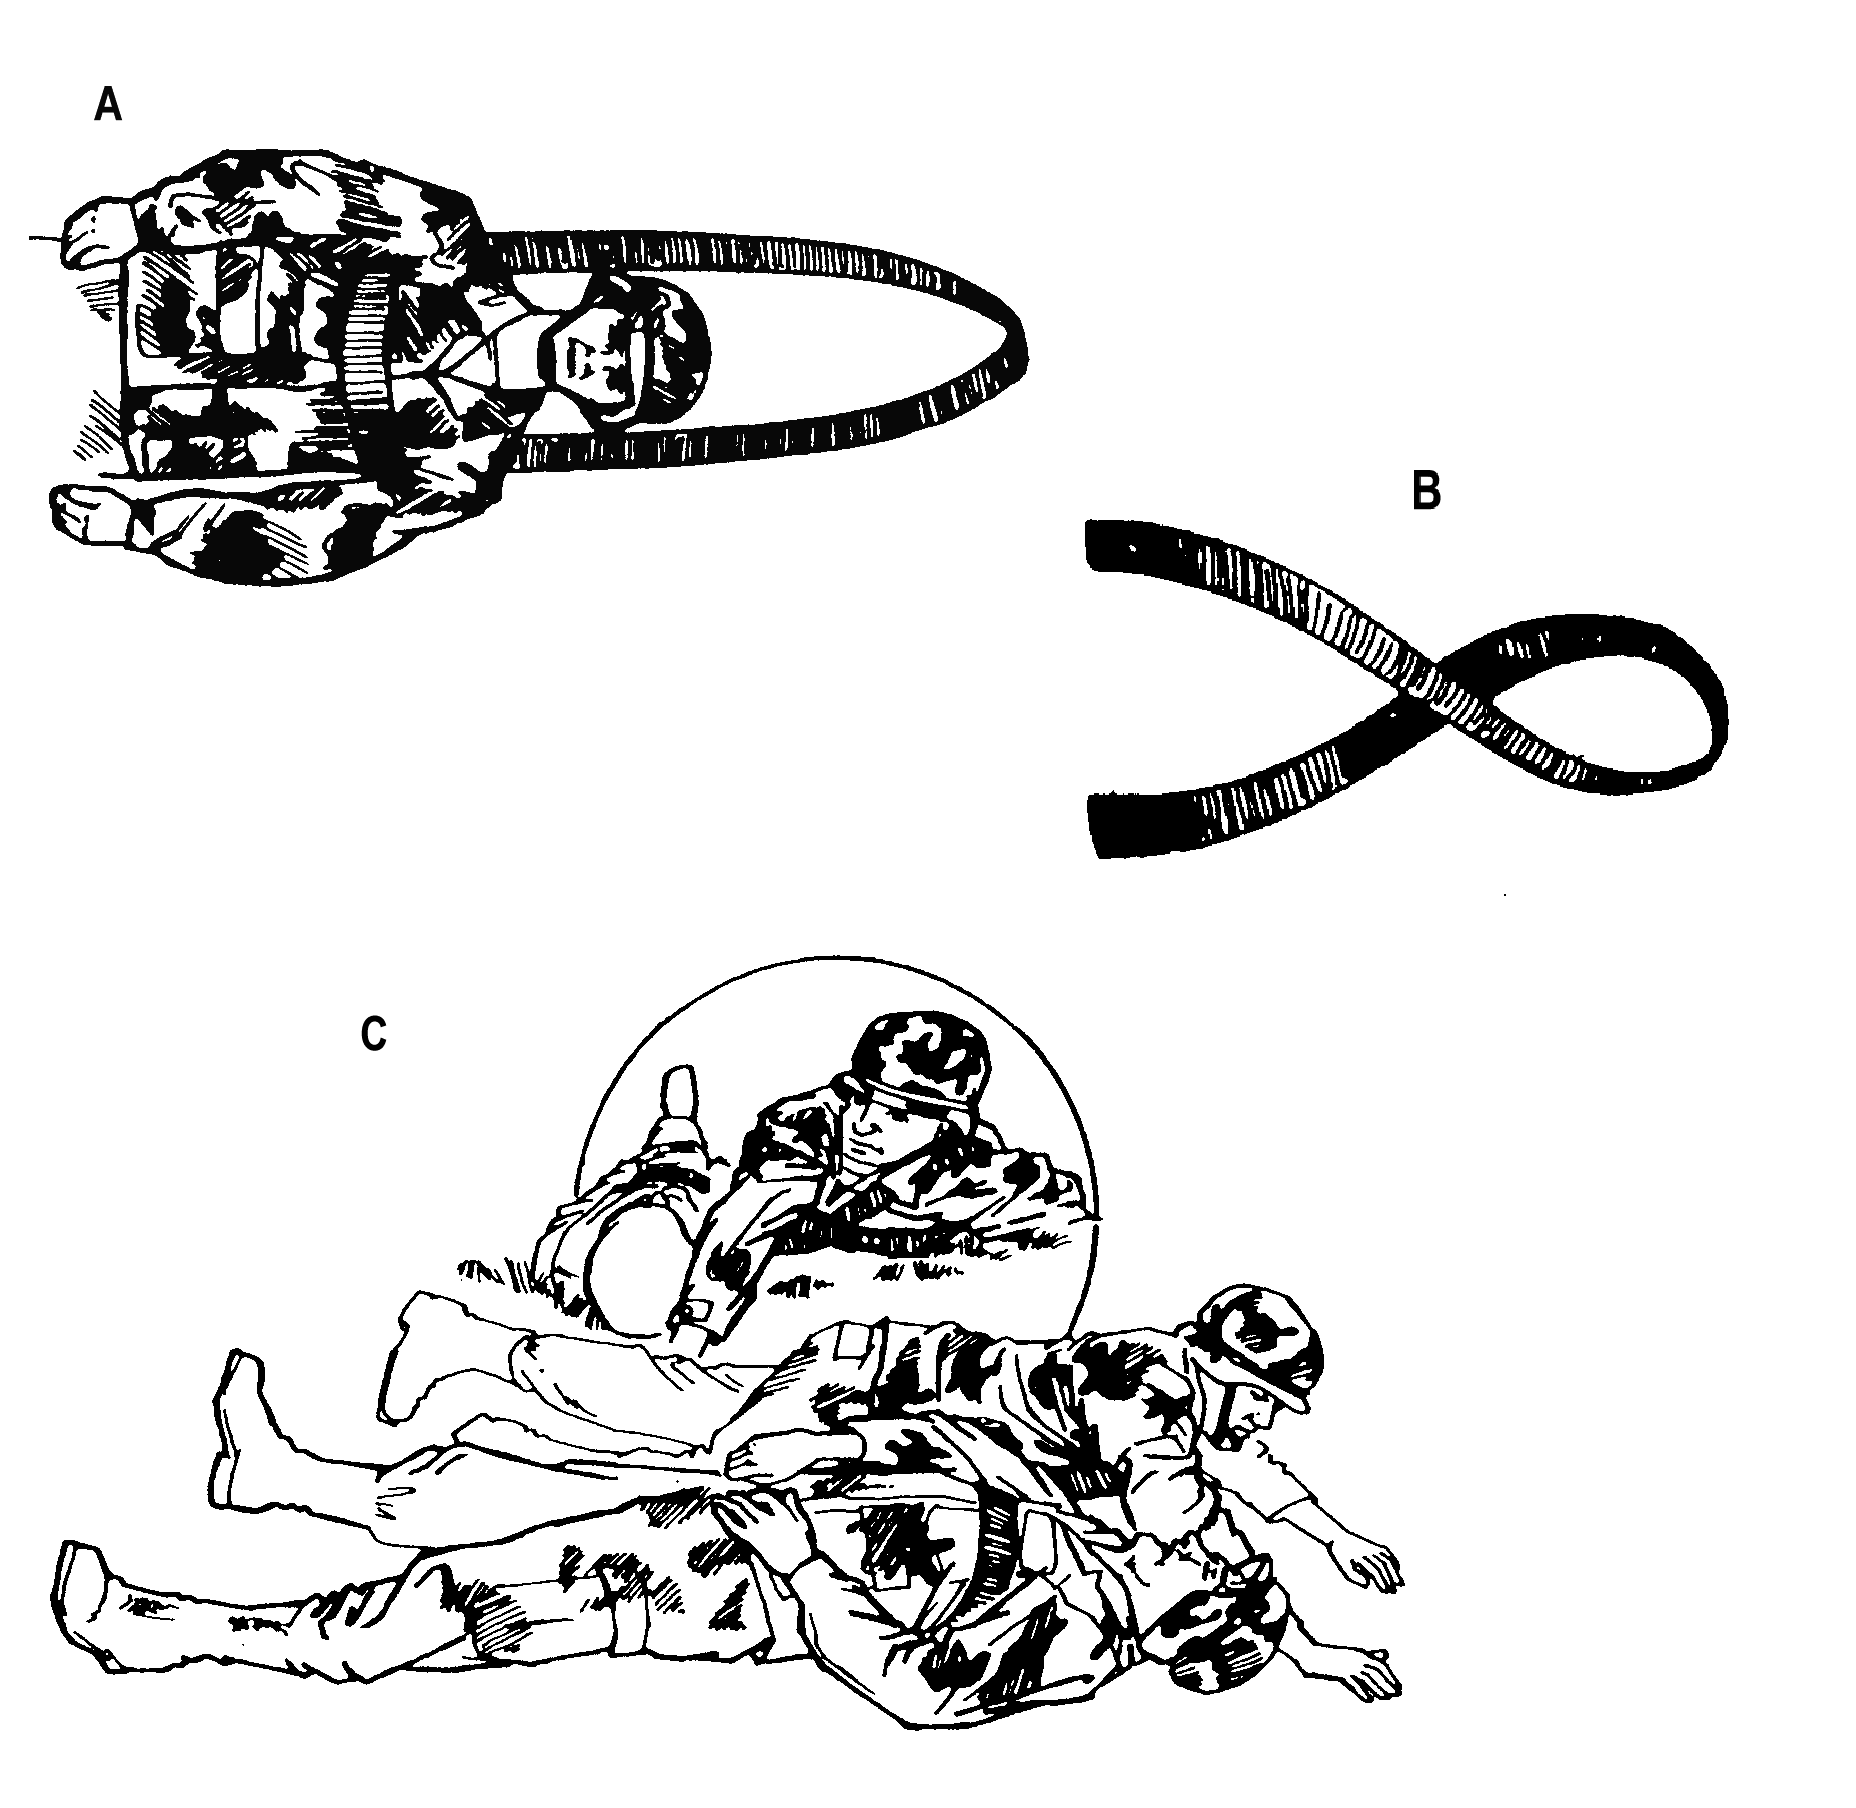
FIGURE 15-9. PISTOL-BELT DRAG