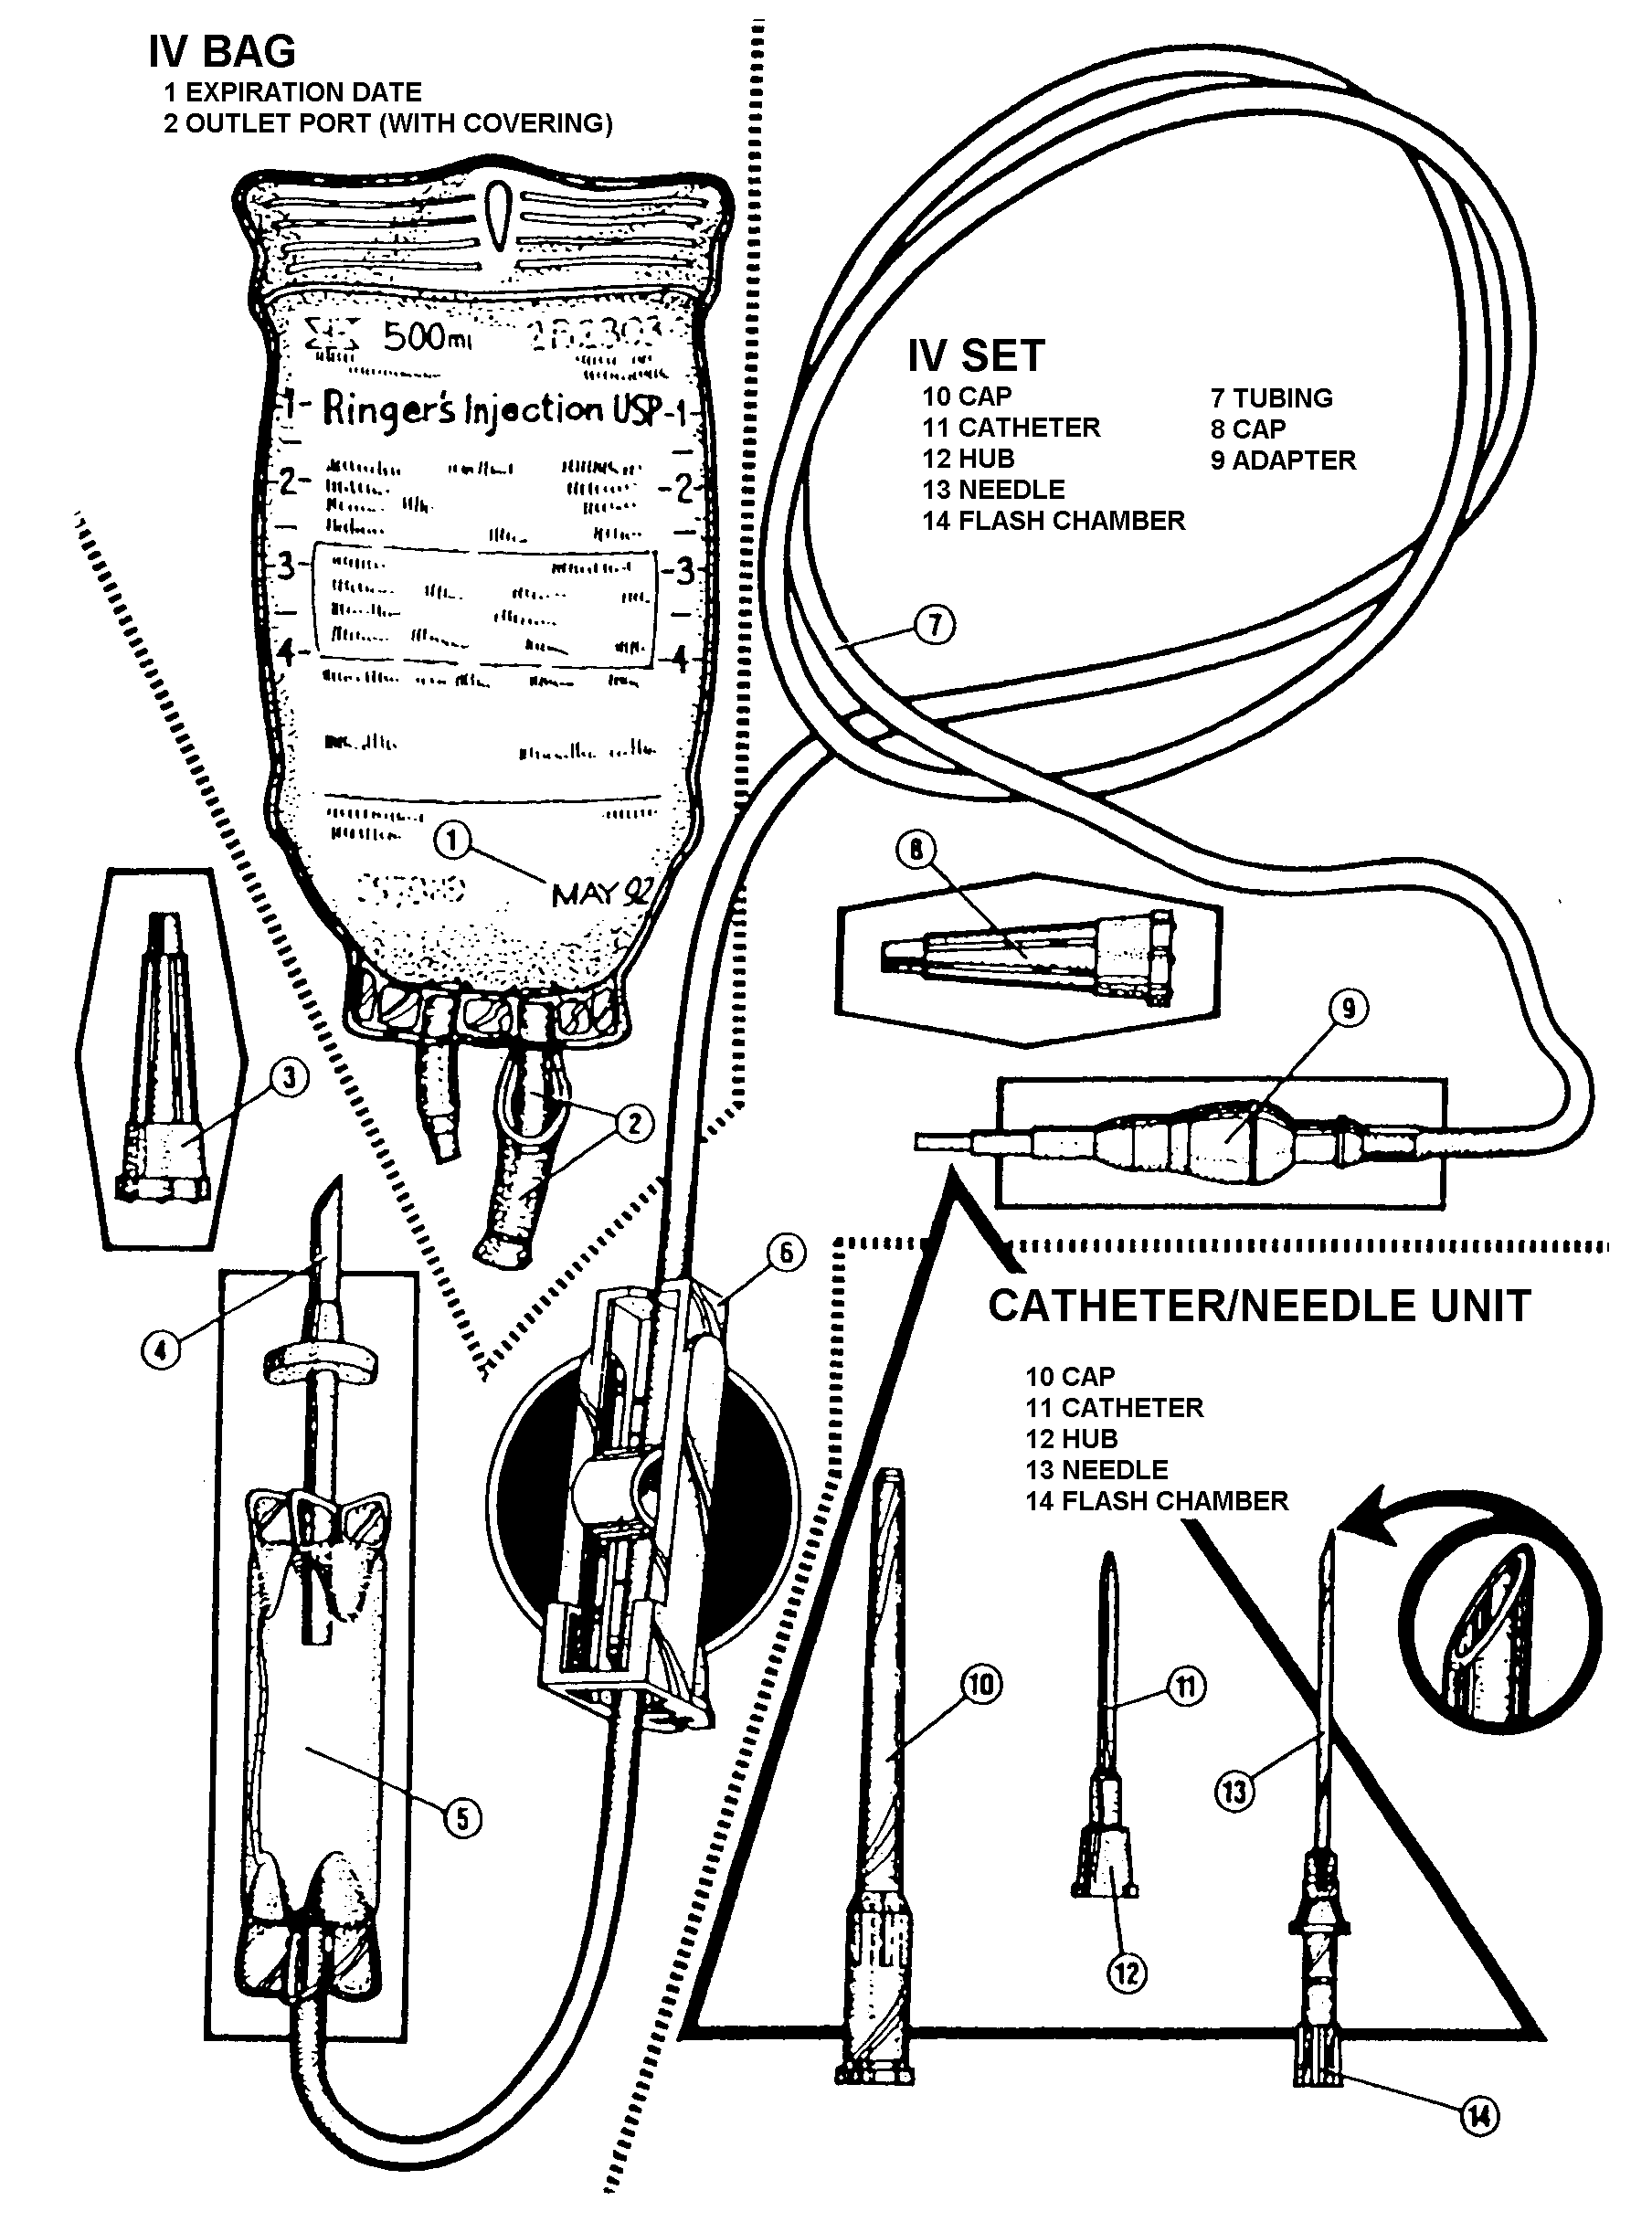
 FIGURE
17-1. I.V. BAG, I.V. SET, AND CATHETER/NEEDLE UNIT
FIGURE
17-1. I.V. BAG, I.V. SET, AND CATHETER/NEEDLE UNIT
LESSON 17
INITIATE AN INTRAVENOUS INFUSION
FOR HYPOVOLEMIC SHOCK
TASK
Initiate an intravenous infusion (I.V.).
CONDITIONS
Given a simulated casualty and needed supplies.
STANDARD
Score a GO on the performance checklist.
REFERENCES
STP 21-1-SMCT, Soldier's Manual of Common Tasks: Skill Level 1.
FM 21-11, First Aid for Soldiers.
STP 8-91B15-SM-TG, MOS 91B Medical Specialist, Skill Levels 1/2/3/4/5.
17-1. INTRODUCTION
The most important tasks of the combat lifesaver are to control hypovolemic (low blood volume) shock by controling hemorrhage and initiating an intravenous infusion (I.V.). The I.V. fluid replaces fluid lost from the casualty's circulatory system. The I.V. fluids contain both water and electrolytes (sodium, potassium, calcium, and chloride compounds). Left untreated, hypovolemic shock can result in death.
17-2. IDENTIFY SIGNS AND SYMPTOMS OF HYPOVOLEMIC SHOCK
Hypovolemic shock is a condition caused by a sudden decrease in volume of fluid in the body's blood circulatory system. On the battlefield, severe blood loss or severe burns usually bring about this condition. Hypovolemic shock can also be caused by dehydration due to severe vomiting, diarrhea, or profuse sweating (heat injury). Watch for signs and symptoms of hypovolemic shock if any trauma resulting in a significant loss of body fluids occurs. When indications of hypovolemic shock are present, take steps to replace lost body fluids by initiating an intravenous infusion (I.V.). The quicker the casualty receives I.V. fluids, the more rapid the improvement in his condition. Signs and symptoms of hypovolemic shock include the following:
Rapid or severe bleeding:
External bleeding from a visible wound.
Internal bleeding from a trauma with no visible wound (usually seen as swelling or discoloration).
Severe burns (second and third degree burns over 20 percent or more of the casualty's skin surface).
Anxiety. (This is an early sign of shock. As fear increases, the heart rate increases, which usually causes the casualty's overall condition to deteriorate.)
Confusion. (The casualty may not understand his surroundings and take inappropriate actions. This condition is generally caused by lack of oxygen to the brain. To test the casualty, ask questions which cannot be answered with a simple "yes" or "no." For example: "What is your name? What is the month and year? What day of the week is it?")
Restlessness. (The casualty may have a strong desire to move about or leave.)
Agitation. (The casualty may become agitated to the point of violent behavior and attack people around him.)
Changes in the level of consciousness. (The casualty may quickly go from fully alert to unconscious.)]
Changes in the level of consciousness. (The casualty may quickly go from fully alert to unconscious.)]
Abnormal pulse (irregular or fluctuating pulse in early stages; weak and rapid pulse in later stages).
Pulse rate over 100 beats per minute.
Low blood pressure (indicated by difficulty in detecting a radial pulse).
Cool, clammy skin.
Change in skin color:
Blotchy or bluish skin, especially around the mouth.
Pale and yellowish coloration in light-skinned individuals.
Grayish lips and fingernail beds in dark-skinned individuals.
Extreme paleness or grayish color of the casualty's eyelids and the inside of his lips.
Rapid, shallow breathing.
Thirst, dry mouth.
Nausea or vomiting.
17-3. PERFORM PRELIMINARY MEASURES TO TREAT A CASUALTY FOR HYPOVOLEMIC SHOCK
Evaluate the casualty. Maintain the airway, if necessary.
Control any external bleeding.
Normally, you will position the casualty on his back and elevate his feet above the level of his heart level to increase the blood flow to the heart.
If you suspect the casualty has a fractured thigh, leg, or ankle, do not elevate the legs until the suspected fracture has been splinted. Initiate the I.V. before splinting the fracture.
If the casualty has an open chest wound, position him on his side with the wounded side next to the ground.
If the casualty has an open abdominal wound, flex the knees.
If the casualty has an open head wound, allow the casualty to sit up or position him on his side with the wound away from the ground.
If the casualty is on a litter, elevate the foot of the litter if the casualty has no open abdominal or open head injury.
If you must leave the casualty or if he is unconscious, turn his head to one side to prevent him from choking should he vomit.
Avoid rough and excessive handling.
Loosen any restrictive clothing from around the neck, waist, or other areas where it might be binding.
CAUTION: Do not loosen or remove the casualty's clothing if you are in a chemically contaminated area.
WARNING
Do not give the casualty anything to eat or drink since it could
cause vomiting. If the casualty vomits, he could inhale his own
vomitus and suffocate. You may moisten the casualty's lips with a
damp cloth.
Initiate an intravenous infusion to replace lost fluids.
Maintain the casualty's normal body temperature.
In cool temperatures, place the casualty on a poncho and cover him with the sides of the poncho. Use a wool blanket if you have one. Do not allow the casualty to lie in water.
In hot or warm temperatures, do not cover the casualty unless he shows signs of chilling. Place him in the shade and/or try to shield him from direct sunlight.
Watch the casualty for signs of sweating or chilling. Remove covering if the casualty is sweating. Cover the casualty if he shows signs of chilling.
CAUTION: If a tourniquet has been applied, leave it exposed so medical personnel can see it quickly.
Check the casualty's pulse and respirations as often as possible to determine if he is responding to treatment. Also monitor the casualty's level of consciousness and changes in skin color.
17-4. PUT ON GLOVES
Cleanliness is the main reason for wearing gloves when you initiate an I.V. In battle, you and your casualty may be smeared with dirt, sand, mud, or blood. The gloves will reduce the chance of various possible infections resulting from the I.V. puncture for both you and the casualty.
In addition to the cause for cleanliness, the gloves should be used because it is impossible to know which casualties are infected with conditions such as HIV, HBV, or other bloodborne diseases.
Always dispose of needles properly. In the combat setting push needles into the ground. This way, no one runs the risk of an accidental needle stick.
If, for some reason, you cannot wear the gloves, start the I.V. anyway.
17-5. GATHER AND CHECK I.V. SUPPLIES
Obtain the following supplies from your aid bag:
I.V. solution bag.
Intravenous infusion set.
Catheter and needle unit (also called over-the-needle catheter or catheter/needle unit).
NOTE: In a combat situation, you may be resupplied with an I.V. solution bag and/or an I.V. set different from the ones shown in class.
Constricting band (tubing).
Antimicrobial (povidone-iodine) ointment.
Povidone-iodine impregnated cotton pads.
Alcohol Pads
Gauze sponges
Adhesive tape.
Scissors.
Remove the I.V. solution bag from its protective cover and check the bag for:
Expiration date. (Do not use outdated solutions.)
Clarity of the fluid. (Make sure the fluid is clear and has no floating particles in the solution.)
Leaks. (Discard any leaky bag. The I.V. solution inside is no longer sterile.)
CAUTION: If there is any doubt about the sterility of the solution, do not use it. Obtain another solution bag.
Check the packaging of the I.V. set and catheter and needle unit for tears and water marks. Tears and watermarks indicate the set or the catheter and needle unit may no longer be sterile. Obtain another set or needle unit.
Remove the I.V. set from its box or package and check the tubing for tears, discoloration, and cracks. Obtain another set if the tubing is discolored or damaged.
FIGURE
17-1. I.V. BAG, I.V. SET, AND CATHETER/NEEDLE UNIT
17-6. PREPARE THE I.V.
NOTE: The procedures may have to be altered slightly depending upon the type of supplies being used.
After removing the infusion set from the package and checking it for damage, move the clamp along the tubing until it is 6 to 8 inches from the drip chamber. Tighten the clamp once it is in position.
Remove the protective covering from the outlet port (long spout) on the I.V. bag. Do not let the tip of the outlet port touch anything until the spike is inserted.
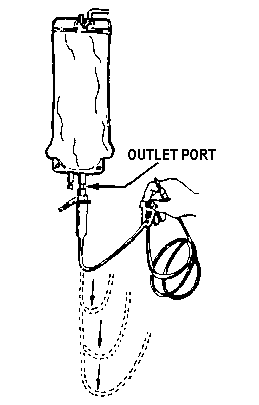
FIGURE 17-2. REMOVING AIR FROM THE TUBING
Remove the protective cap from the spike on the infusion set. Grasp the drip chamber with one hand and the spike cap with the other hand. Remove the cap with a twisting motion without touching the spike.
Insert the spike into the exposed I.V. outlet port with a twisting motion. The spike will penetrate the seal in the outlet port. Do not touch the end of the port or the spike during the procedure.
Hang the bag on an object above the level of the casualty's heart, if possible, or hold the bag up until you have completed removing air from the tubing.
Squeeze the drip chamber until half of the chamber is filled with I.V. solution.
Remove the air from the tubing.
Hold the end of the tubing above the bottom of the bag.
Release or loosen the tubing clamp. (This allows the fluid to flow into the tubing.)
Loosen the protective cap over the adapter. (This allows the air to escape from the tubing.)
Gradually lower the tubing until the solution reaches the end of the adapter.
Reclamp the tubing and retighten the cap over the adapter.
NOTE: In the classroom, loop the tubing over the I.V. stand, if used, to protect it from contamination while you prepare the I.V. site.
WARNING
If air is not removed from the tubing, it can enter the bloodstream and rapidly move to the heart (air embolism). An air embolism can cause the casualty's heart to stop beating (cardiac arrest). It is essential that you make sure there is no air in the tubing.
Cut or tear four strips of tape (about 4-inches in length) and hang them on the bag.
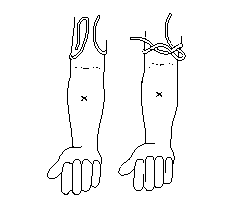
17-7. SELECT AND PREPARE AN INFUSION SITE
Expose possible infusion sites by removing, tearing, or cutting away clothing if necessary.
Look and feel (palpate) for a vein. The vein should be as close to the end of the extremity as possible. Make sure the site is free of scars, moles, and excessive hair.
Avoid joints, areas where a pulse is palpable, and veins near or below injuries.
Select a straight vein, one that feels springy when touched and does not roll.
If you have difficulty finding a vein, lower the arm below the level of the heart. If you still cannot find a vein on the arm or hand, try to find a vein on the foot. If this fails, try to find a vein on the leg.
CAUTION: Attempt to penetrate the vein at the most distal point (the one closest to the end of the extremity, farthest away from the heart) that is practical. If you are unsuccessful the first time, move toward the heart for your second attempt. The arm is the most convenient place for performing this procedure.
Apply the constricting band (tubing) 6 to 8 inches above the infusion (venipuncture) site in such a manner that the band can be released using only one hand.
Stretch the band slightly.
Wrap the band around the limb so that one end of the remaining band is longer than the other end.
Loop the longer end and draw it under the shorter end. Be sure the tails point away from the infusion site
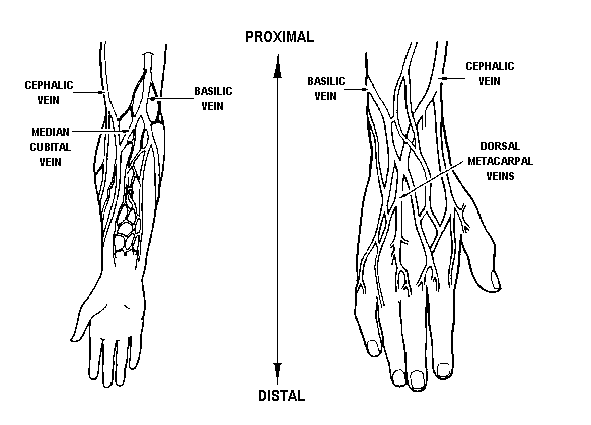
FIGURE 17-3. VEINS ON THE FOREARM AND HAND
WARNING
The constricting band should not remain in place more than two minutes.
Ask the casualty (if conscious) to clench and relax his fist several times, then keep his fist clenched. If the casualty is unconscious, place the limb below the level of heart.
FIGURE 17-4. APPLYING A CONSTRICTING BAND
Palpate the vein with your fingertips again (after the clenching) to make sure that the vein is still suitable.
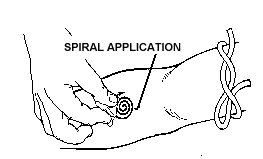
Open a packet containing a povidone-iodine impregnated cotton pad and cleanse the
skin at the selected infusion site. Wipe the site using a circular motion, beginning at the center of the site and spiraling outward.
Open a packet containing an alcohol pad and make one pass directly over the vien from proximal to distal, removing the povidone-iodine to facilitate the visualization of the vein. Let the alcohol dry and do not palpate the vein again or touch the site after cleansing
17-8. INITIATE INFUSION
Place the tubing so that the needle adap is within easy reach.
Open the packaging of the catheter and needle unit and remove the unit.
Hold the stem (flash chamber) of the unit with the thumb and forefinger of your dominant hand (the hand with which you write) and use your other hand to remove the protective cap from the unit. Hold the unit so the bevel of the needle is up.

FIGURE 17-6. NEEDLE WITH BEVEL UP
CAUTION: Do not touch the exposed needle or catheter.
Pull the skin taut by pressing approximately one inch above or below (usually below) the infusion site with the thumb of your nondominant hand.
Position the needle slightly to the side of the vein at approximately a 20o to 30o angle.
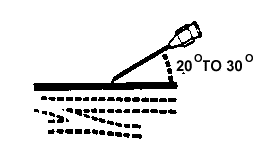
FIGURE 17-7. INSERTING THE BEVEL
INTO THE SKIN
Insert the needle tip into the skin with the bevel up. Insert only the bevel of the needle beneath the skin.
Lower the angle of the catheter and needle until it is almost parallel to the skin surface.
Insert the needle into the vein. A slight "give" is felt as the needle enters the vein.
Check for blood in the flash chamber. If the needle is in the vein, blood will appear in the flash chamber.
If the venipuncture (penetration of the vein) is not successful, pull the catheter and needle unit back slightly, but do not pull the bevel above the skin surface. Attempt to direct the needle point into the vein again.
If you are still unsuccessful, release the constricting band, withdraw the catheter and needle completely, obtain another catheter and needle unit, and attempt another venipuncture at a point proximal to (above) the previous attempt.
If you are still unsuccessful after the second venipuncture attempt, obtain medical assistance, if available. Do not attempt another venipuncture. If medical assistance is not available, evacuate the casualty as soon as practical.
When you have blood in the flash chamber, hold the catheter and needle unit in place.
Advance the catheter and needle unit approximately 1/8 inch farther to ensure that the catheter itself is in the vein.
Stabilize the flash chamber with your dominant hand. Grasp the catheter hub with your nondominant hand.
Thread the entire length of the catheter into the vein (to the hub).
CAUTION: Only the catheter is advanced into the vein. The needle is not advanced.
While continuing to hold the catheter hub with your nondominant hand, press lightly on the skin over the catheter tip with a finger of the same hand. (Pressing lightly on the skin over the catheter tip is necessary in order to decrease or stop the flow of blood from the catheter hub after the needle is removed.)
With your dominant hand, remove the flash chamber with the attached needle from the catheter and lay the flash chamber/needle aside.
Ask the casualty to unclench his fist.
Without switching hands, release the constricting band.
Remove the protective cap from the adapter with your dominant hand and quickly insert the tip of the adapter tightly into the catheter hub.
Relax the finger which was pressing on the skin over the catheter.
WARNING
After the needle is removed, do not attempt to reinsert it into the catheter. Reinsertion could cause a portion of the catheter to be sheared off, enter the bloodstream, and move to the heart where it could cause cardiac arrest.
Loosen the clamp on the tubing to allow the I.V. solution to flow.
Check the drip chamber to make sure the flow has started.
Adjust the clamp so the I.V. tubing is clamped (constricted) about half way. The fluid should be flowing fast enough that you can barely count the individual drops of fluid.
WARNING
If head injuries are present, run the I.V. as slowly as possible (about ten drops per minute), but keep the solution flowing.
Check the infusion site for signs of infiltration (fluids going into the tissues rather than the vein). The signs of infiltration are:
Unusual pain felt by casualty at site of infusion.
Swelling at the site of the infusion.
Redness at the site of the infusion.
Site is cool to the touch.
Clear fluid leaking around the site.
WARNING
If signs of infiltration are present, clamp the I.V. tubing, remove the catheter from the casualty, obtain a new catheter and needle unit, and attempt the infusion at a site above the last attempt.
If infiltration is not present, proceed to secure the catheter and I.V.
17-9. SECURE THE I.V.
Remove two strips of tape from the I.V. bag and use them to make a diagonal
cross over the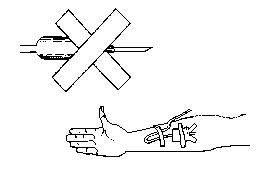 catheter hub. Once the hub is secured,
release your hold on the adapter.
catheter hub. Once the hub is secured,
release your hold on the adapter.
FIGURE 17-8. SECURING THE I.V.
Place a gauze pad over the infusion site. Open the package and place the gauze pad over the hub and adapter.
Use one piece of tape to secure the adapter. (The tape is placed across the adapter if a gauze pad is not used. If a gauze pad is applied, secure both the pad and the adapter with the tape.)
Make a loose safety loop of tubing on top of the extremity with the tubing below (distal to) the infusion site.
Secure the loop of tubing with the fourth piece of tape.
Position the I.V. bag so the fluid will continue to flow from the I.V. bag into the casualty's vein.
If possible, hang the bag from a stable object with the bag higher than the casualty's heart. Gravity will cause the fluid to flow.
If the bag cannot be hung, place the bag under the casualty's lower back. Be sure that the drip chamber is completely full to prevent the introduction of air into the venous system. The pressure from the casualty's body will force fluid from the bag. This method can be used when evacuating the casualty on a litter.
17-10. REMOVE THE CATHETER
If the infusion site becomes infiltrated, fluid in the I.V. bag is used up, or you must stop the infusion for any reason, use the following steps to remove the catheter.
Adjust the clamp on the tubing so the flow of fluid is stopped.
Loosen and remove the strips of tape. Remove the tape from the loop of tubing; then the strip of tape securing the adapter; then the two strips of tape securing the catheter hub. When removing a strip of adhesive tape, start at the ends of tape and loosen toward the middle.
Remove the catheter from the vein by pulling it out at the same angle used in inserting the needle (almost parallel to the skin).
Cover the puncture site with an adhesive bandage from your aid bag. (The small, sterile dressing on the adhesive bandage will help to stop bleeding and prevent infection.)
Apply manual pressure over the site for about 5 minutes to help control bleeding. (This step may be performed by the casualty.) Antimicrobial ointment and a self-adhesive bandage can also be applied.
The performance checklist following the practice exercises is provided for three reasons. First, it is a review of the procedures given in this lesson. Second, it allows you to become familiar with a checklist similar to the one which will be used to evaluate your performance. Third, it allows you to practice on an I.V. training device with another student evaluating your performance. DO NOT ATTEMPT TO TRAIN ON ANOTHER PERSON WITHOUT PROPER CLASSROOM SUPERVISION.
Study the performance checklist for administering an I.V.