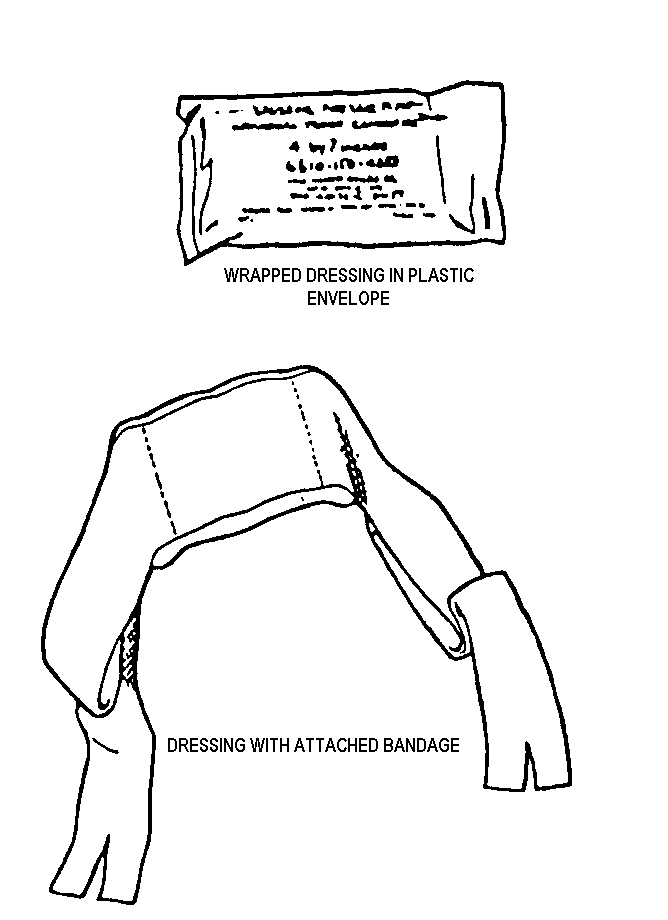
 FIGURE
4-1. FIELD DRESSING
FIGURE
4-1. FIELD DRESSINGLESSON 4
PERFORM FIRST AID FOR BLEEDING
OF AN EXTREMITY
Apply a field dressing, elevation, manual pressure, a pressure dressing, and a tourniquet, as needed, to a wound on a casualty's limb.
CONDITIONS
Given a simulated casualty with bleeding from a limb and needed supplies.
STANDARD
Score a GO on the performance checklist.
REFERENCES
STP 21-1-SMCT, Soldier's Manual of Common Tasks: Skill Level 1.
FM 21-11, First Aid for Soldiers.
4-1. INTRODUCTION
A casualty who is losing blood (hemorrhaging) may die unless the bleeding is stopped. Bleeding from a limb (arm or leg) can usually be controlled by applying a field dressing, applying manual pressure, elevating the injured limb, and (if needed) applying a pressure dressing. If these methods do not control the bleeding, a tourniquet can be placed around an upper arm or thigh to stop the flow of blood below the band.
The term dressing refers to the material that is placed directly over the wound. The dressing absorbs some of the blood and helps a clot to form. The clot "plugs" the wound to stop the bleeding. The dressing also protects the wound from additional contamination and injury.
A bandage is the material used to hold (secure) the dressing in place so the dressing will not slip and destroy the clot that is forming. The ends of the bandage are called the tails.
The field dressing consists of a pad of sterile (germ-free) white dressing with a bandage (usually olive-drab) already attached to the dressing pad. The field dressing is wrapped in paper and then sealed in a plastic envelope. The field dressing is also called the first aid dressing and the combat dressing.
CAUTION: Monitor the casualty's respirations if he is unconscious. If the casualty stops breathing, administer mouth-to-mouth or mouth-to-nose resuscitation (except in a chemical environment).
 FIGURE
4-1. FIELD DRESSING
4-2. EXPOSE THE WOUND
Tear, cut, push, and/or lift the casualty's clothing from the area around the wound so you can see the full extent of the injury.
WARNING
If you are in a chemical environment, do not expose the wound. Place the dressing over the wound and protective clothing and evacuate the casualty.
Avoid causing additional damage to the wound. If clothing is stuck to the wound area, cut or tear around the stuck material and leave that part of the clothing stuck to the wound. Do not try to remove objects from the wound. Do not try to clean the wound.
Look for both entry and exit wounds.
4-3. APPLY AND SECURE FIELD DRESSING
After you have exposed the wound, obtain a field dressing. If the soldier still has a field dressing in his plastic individual first aid case, use this field dressing first in order to conserve your supplies. [NOTE: If you use up all of the field dressings in your aid bag, improvise a dressing and bandage using the cleanest cloth available.]
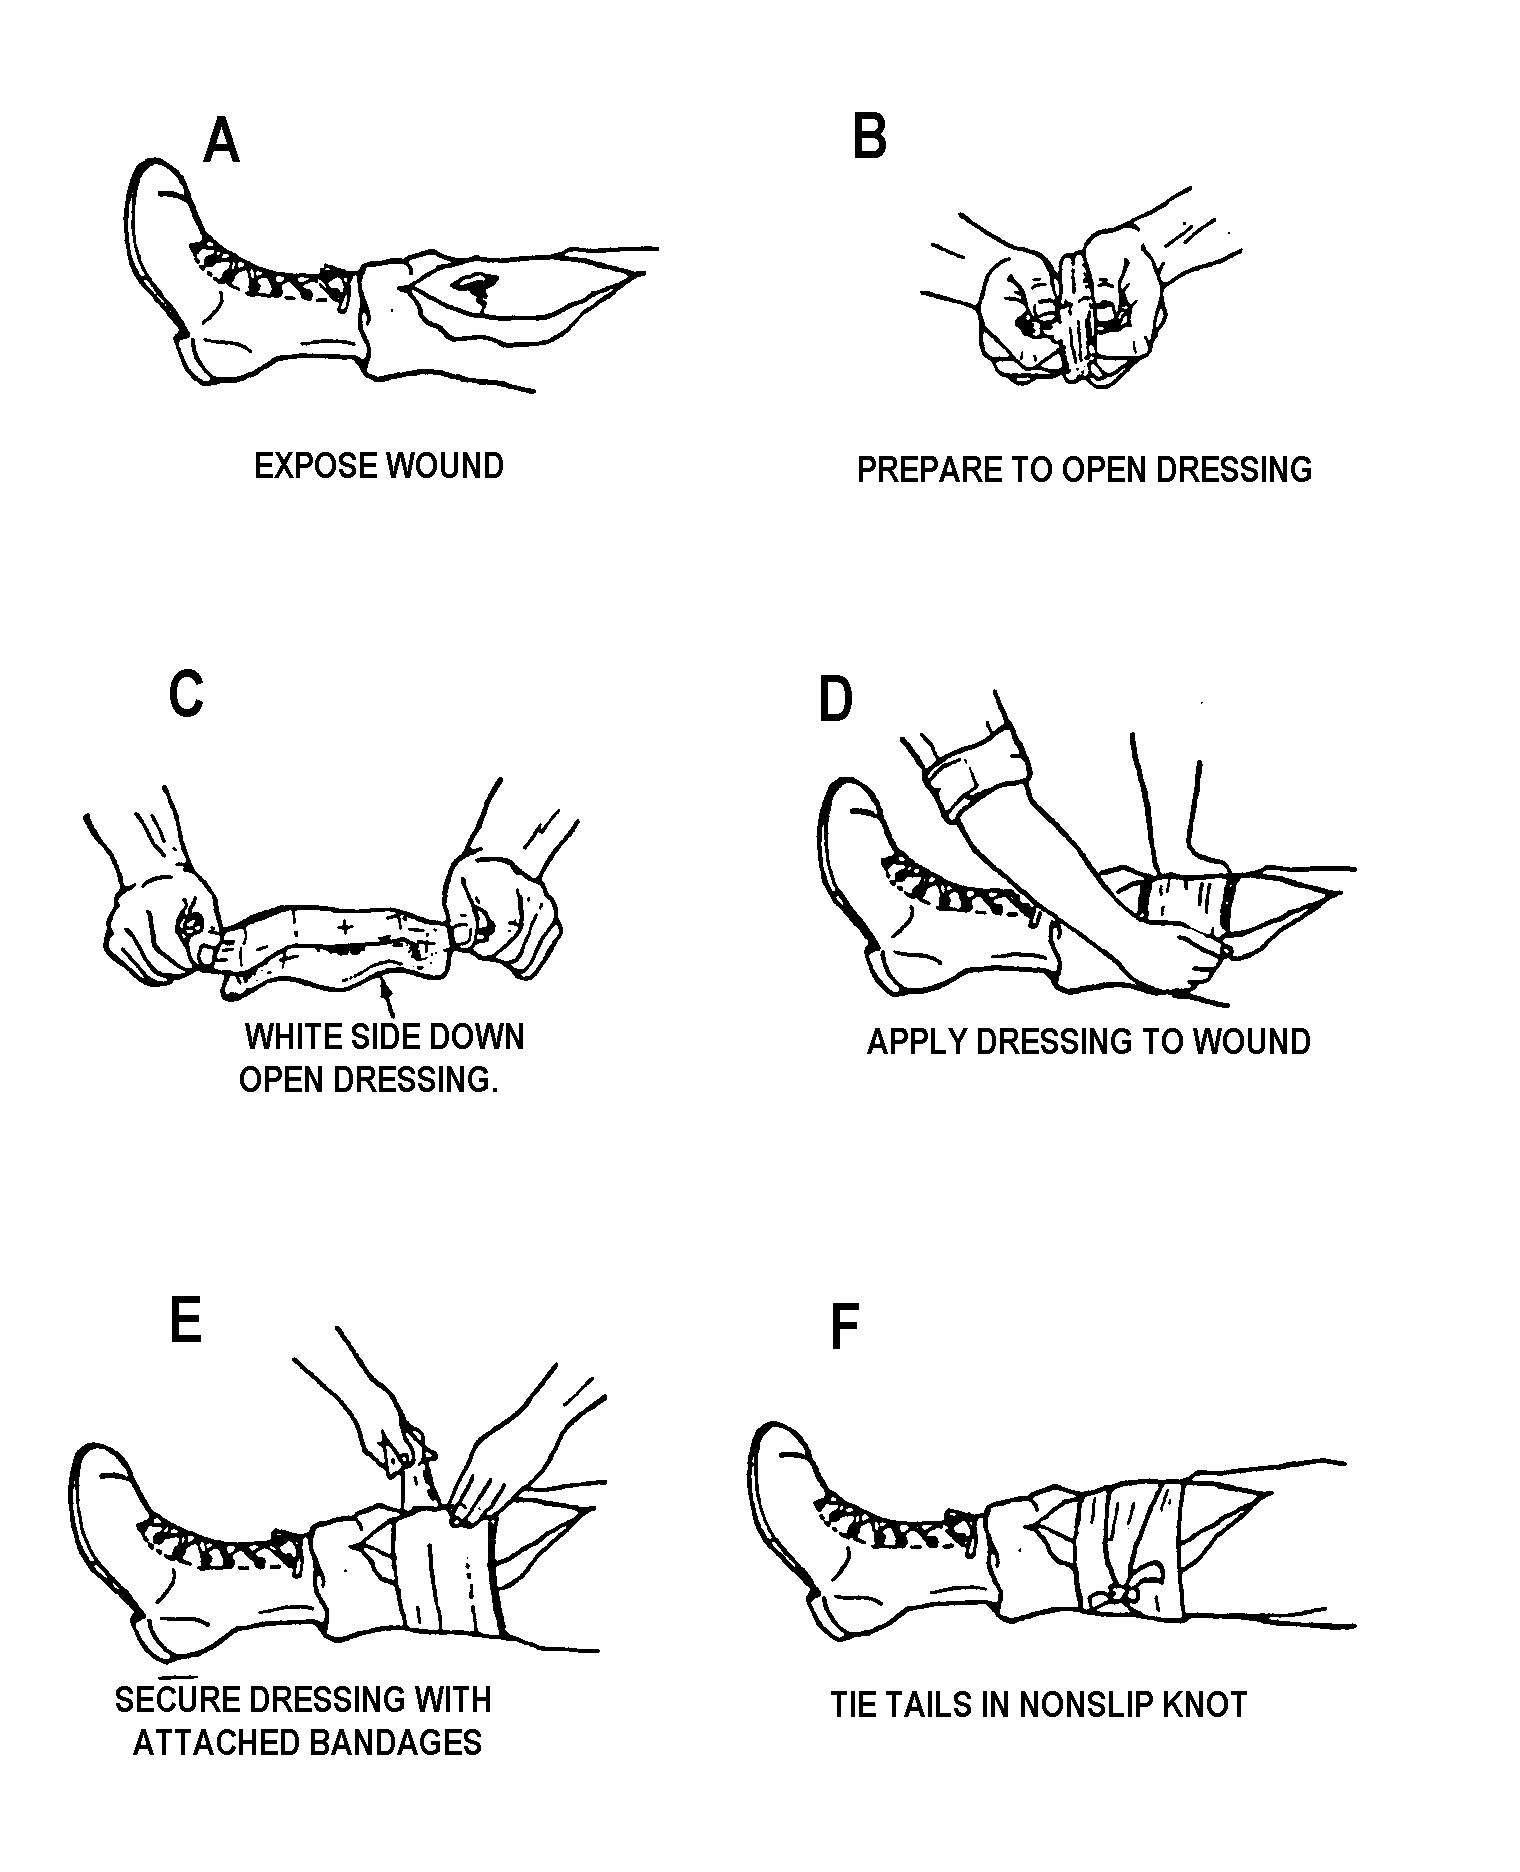 FIGURE
4-2. APPLYING AND SECURING A FIELD DRESSING
Tear the plastic envelope and remove its contents.
Twist the paper wrapper until it breaks or tear it open.
Grasp the folded bandage/tails with both hands.
Hold the field dressing above the exposed wound with the white side of the dressing material toward the wound.
Pull on the bandage/tails so the dressing opens and flattens.
CAUTION: Do not touch the white sterile side of the dressing.
Place the dressing on the wound. Remember, the white side goes on the wound.
CAUTION: If there is an impaled object (stick, etc.) sticking out of the wound, do not remove the object. Use bulky dressing made from the cleanest material available to build up the area around the protruding object in order to stabilize the object and protect the wound. Then apply a bandage over the dressing.
Place one hand on top of the dressing to hold the dressing in place. If the casualty is conscious, you can have him hold the dressing in place while you secure it.
Wrap one of the bandages around the injured body part with your free hand. As you wrap, cover one of the exposed sides of the dressing with the bandage. (The bandage can usually be wrapped around a limb more than once.) Bring the tail back over the dressing.
Wrap the other bandage around the injured body part in the opposite direction. As you wrap, cover the remaining exposed side of the dressing with the bandage. Bring the tail back to the dressing.
Tie the tails into a nonslip knot over the outer edge of the dressing, not over the wound itself. (Tying the knot over the wound could cause additional injury to the wound site.) The tails should be tied firm enough to prevent the dressing from slipping, but loose enough to insert two fingers between the knot and the dressing.
If the wound is on a limb, check the circulation below (distal to) the bandage. If the skin below the bandage becomes cool to the touch, bluish, or numb or if a pulse cannot be detected below the bandage, the bandage may be too tight and interfering with circulation. If so, loosen and retie the tails; then check the circulation again. If circulation is not restored, evacuate the casualty as soon as possible. Medical treatment may be needed to keep the limb from being amputated due to poor blood circulation and tissue death.
CAUTION: Do not remove the dressing from the wound. Removing the dressing could interfere with any clot that has begun to form.
4-4. APPLY MANUAL PRESSURE
Apply direct pressure over the dressing with your hand. This pressure will help to compress the damaged blood vessels and control the bleeding. Maintain this pressure for 5 to 10 minutes. If the casualty is conscious and can follow instructions, you can have him apply the manual pressure himself.

FIGURE 4-3. APPLYING MANUAL PRESSURE
4-5. ELEVATE THE INJURED LIMB
Elevate the injured limb above the level of the casualty's heart to decrease bleeding. An injured leg can be raised by placing the foot and ankle on a pack, log, rock, or other object. An injured forearm can be elevated by placing the forearm on the casualty's chest if he is lying on his back or by having the casualty place his arm on top of his head if he is sitting. Elevating the injured limb and applying manual pressure should be done at the same time when no fracture is involved.
WARNING
Examine an injured extremity (arm or leg) for fractures (visible broken bone, deformity of the limb, etc.) before elevating the limb. If a fracture is suspected, do not elevate the wound until the limb has been splinted.
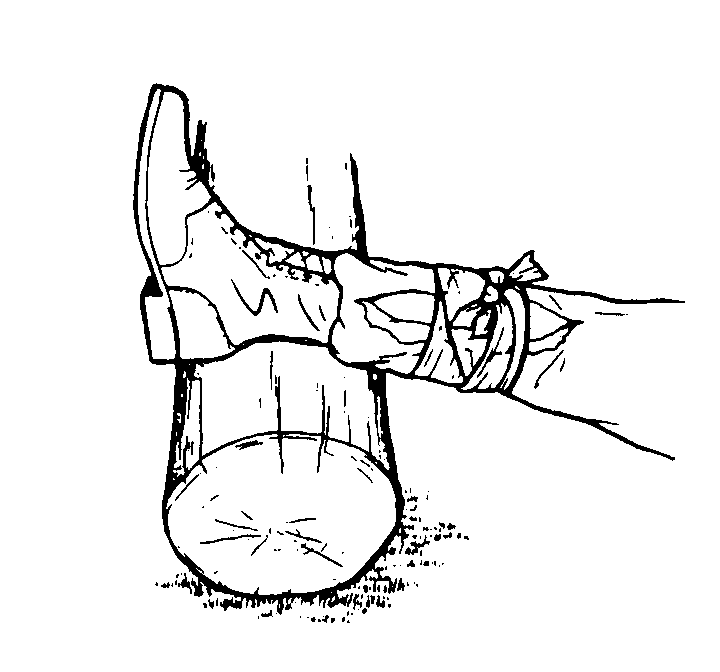
FIGURE 4-4. ELEVATING THE WOUND
4-6. APPLY A PRESSURE DRESSING
If blood continues to seep from the dressing after you have secured the dressing, applied manual pressure, and elevated the wound (if applicable), you should apply a pressure dressing. The objective of applying a pressure dressing is to stop the bleeding, not to stop all blood circulation below the wound. (Stopping all blood circulation would endanger the body tissue below the pressure dressing.)
WARNING
A pressure dressing is applied only to a wound on an extremity (arm or leg).
![]()
FIGURE 4-5. APPLYING A PRESSURE DRESSING
Place a wad of material on top of the dressing and directly over the wound. The wad can be made from a folded muslin bandage (cravat) from the combat lifesaver aid bag, a rag, material torn from clothing, or similar material that can be folded several times.
CAUTION: The pressure dressing is applied on top of the field dressing. The field dressing is not removed or retied. Moving the field dressing would interfere with any clot that has begun to form.
Place a bandage over the wad of padding and wrap the bandage tightly around the limb. The bandage is usually made from a muslin bandage from the combat lifesaver aid bag or other material torn and folded into a cravat. Other materials such as a handkerchief, sock, or strip of cloth torn from a shirt can also be used. Wire and narrow material, such as a shoestring, are not used since they are likely to damage blood vessels and nerve tissue.
Tie the ends of the bandage to secure the padding. A nonslip knot should be tied directly over the wound. The bandage should be tight enough so only the tip of one finger can be inserted under the bandage. Do not tie the bandage so tight that it cuts off blood circulation.
Check the circulation below the pressure dressing. If the skin below the pressure dressing becomes cool to the touch, bluish, or numb, or if the pulse below the pressure dressing is no longer present, the pressure dressing may be too tight. If so, loosen and retie the tails. If circulation is not restored, evacuate the casualty as soon as possible. [NOTE: The pressure dressing can be loosened and retied without disturbing the blood clot forming under the field dressing.]
Apply manual pressure over the pressure dressing.
If the pressure dressing controls the bleeding, proceed to check the casualty for other injuries. Recheck the circulation below the pressure dressing periodically and monitor the casualty for shock (Lesson 8).
If the wound continues to bleed, apply a tourniquet as described in the following paragraphs.
4-7. DETERMINE WHEN A TOURNIQUET IS NEEDED
A tourniquet is a constricting band placed around a limb (upper arm or thigh) in order to stop the flow of the blood below the band.
A tourniquet is needed when the amount of blood being lost from a limb endangers the casualty's life and the bleeding cannot be stopped by the application of a field dressing, manual pressure, elevation, and pressure dressing.
A tourniquet is not used for wounds to the head, neck, or trunk.
A tourniquet is not used for a wound on the hand or foot. Bleeding from the amputation of part of a hand or part of a foot can be controlled by application of a pressure dressing, manual pressure, and elevation. It does not require the application of a tourniquet.
A tourniquet is needed when there has been an amputation (complete severing) of an upper arm, forearm, thigh, or lower leg.
WARNING
Do not attempt to control the bleeding from an amputation of a limb (not part of a hand or foot) by applying a field or pressure dressing.
Apply a tourniquet to the arm or leg even if the stump is not bleeding severely. The lack of bleeding is due to the body's normal defenses (constriction of blood vessels), but the stump will begin to bleed profusely when the blood vessels relax.
4-8. GATHER MATERIALS FOR MAKING A TOURNIQUET
a. Tourniquet Band
You will need a band of strong, pliable material which is at least two inches wide when folded and will retain this width after being tightened. A folded muslin bandage (usually called a cravat), a folded handkerchief, or a folded strip of clothing will do. Do not use wire or shoestrings for a tourniquet band. A wide tourniquet will protect the tissue beneath the tourniquet when it is tightened. If a very narrow tourniquet is used, the nerves and blood vessels beneath the tourniquet may be seriously damaged.
b. Rigid Object
A rigid object, usually a stick, is needed to tighten the tourniquet.
c. Securing Materials
Additional material may be needed to secure the rigid object once the tourniquet has been tightened. If the tourniquet band is long enough, the tails can be used to secure the rigid object. If not, a piece of cloth similar to the tourniquet band will be needed.
d. Padding
Material is placed between the limb and the tourniquet band to protect the skin from being pinched and twisted when the band is tightened. Soft, smooth material should be used for padding. The casualty's shirt sleeve or trouser leg can be used as padding.
4-9. SELECT A TOURNIQUET SITE
Select an upper arm or thigh site. If the wound is in the upper arm or thigh, select a site that is two to four inches above the edge of the wound or amputation site. If the wound or amputation is below the elbow or knee, select a site above the joint and as close to the joint as possible. A tourniquet should not be placed over a joint or over a fracture site.
4-10. APPLY A TOURNIQUET
WARNING
A tourniquet is used only as a last resort (other than an amputation) when blood loss from a wound endangers the casualty's life and the bleeding cannot be controlled by other methods. The portion of the limb below the tourniquet may need to be amputated when the casualty reaches a medical treatment facility. Using a tourniquet usually means sacrificing a limb in order to save a life.
![]()
FIGURE 4-6. FOLDING A MUSLIN BANDAGE OR A SQUARE
OF MATERIAL INTO A TOURNIQUET BAND
Place padding around the limb where the tourniquet will be applied. If the casualty's shirt sleeve or trouser leg is covering the tourniquet site, smooth the shirt or trouser material and apply the tourniquet over the clothing.
Place the tourniquet band material around the tourniquet site.
Tie the band with a half-knot (the same as the first part of tying a shoe). Place the rigid object on top of the half-knot.
Tie a full knot over the rigid object.
Twist the rigid object either clockwise or counterclockwise until the tourniquet is tight and the bright red bleeding has stopped. Bright red blood is from a severed artery. Generally, darker blood is from a vein. Dark blood may continue to ooze even after the tourniquet has been properly applied. There should be no pulse below the tourniquet.
Wrap the tails of the tourniquet band around the end of the rigid object so the rigid object will not untwist, bring the tails under the limb, and tie the tails in a nonslip knot.
CAUTION: If the rigid object cannot be secured with the tails of the tourniquet band, wrap a piece of material around the limb below the level of the tourniquet. Then wrap the ends of the material around one end of the rigid object so the tourniquet will not unwind, and tie the tails of the material in a nonslip knot. The rigid object is secured below the tourniquet so the securing material will not interfere with blood circulation above the tourniquet.

FIGURE 4-7. TOURNIQUET APPLIED TO AN ARM AMPUTATION
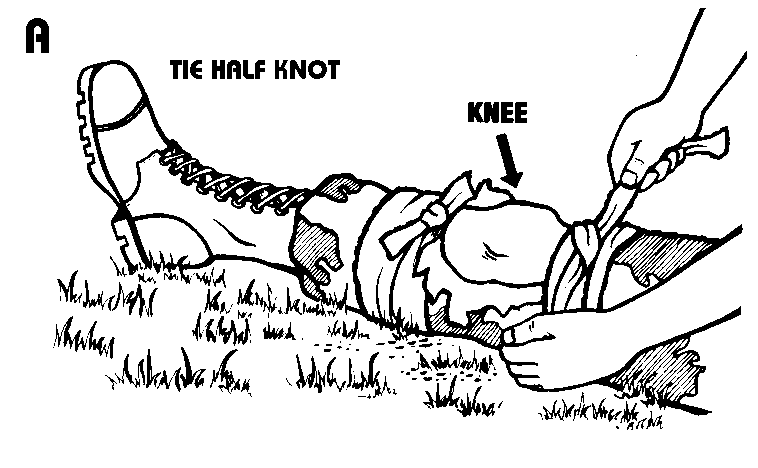
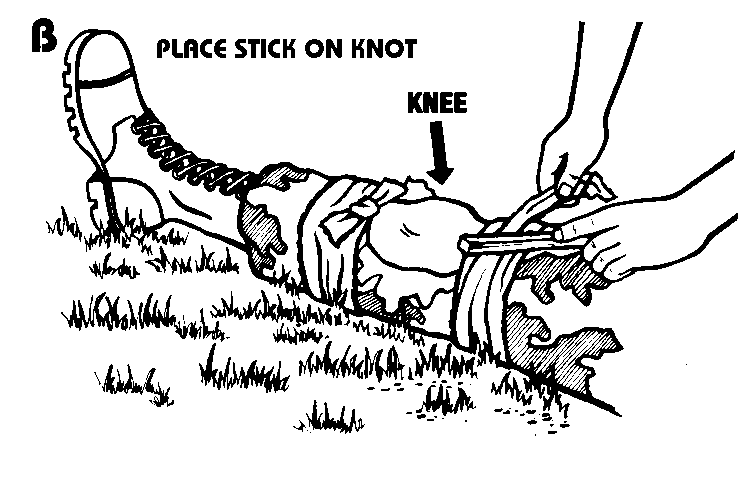


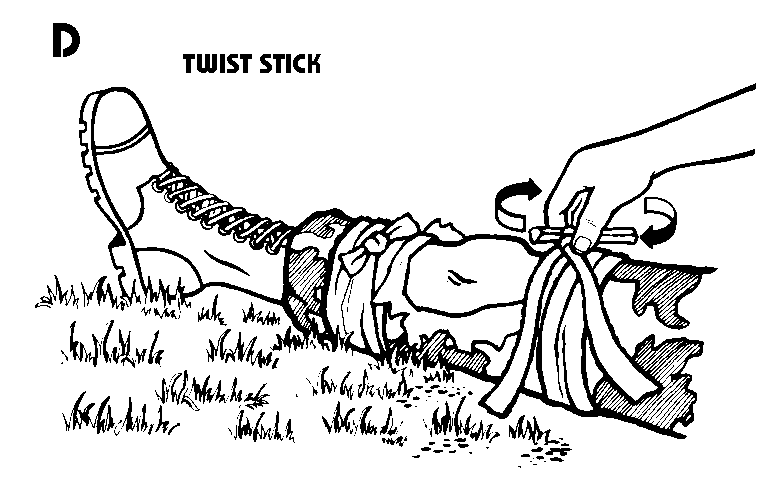
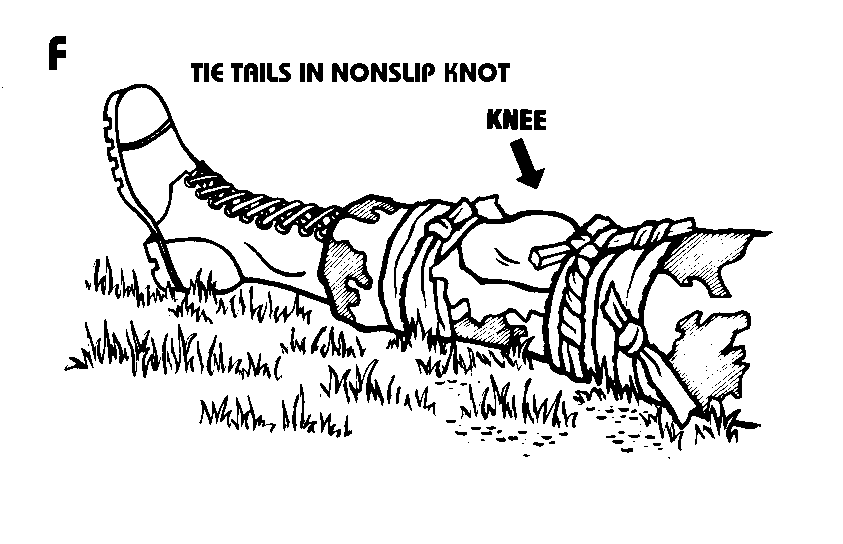
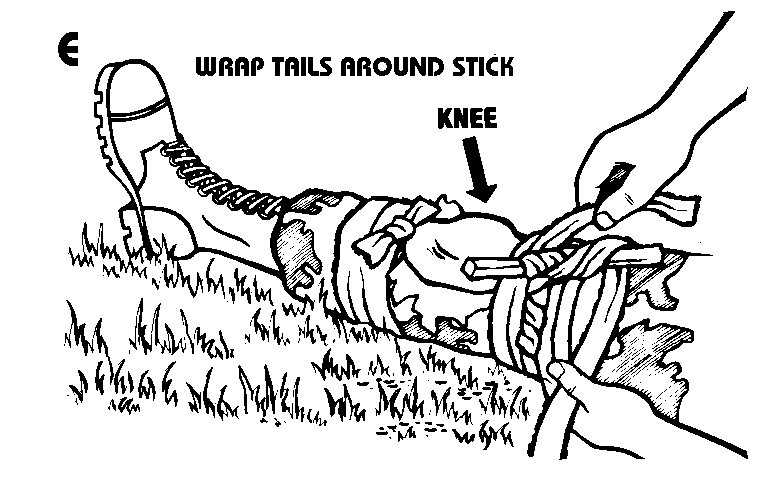

FIGURE 4-8. APPLYING A TOURNIQUET TO A LIMB
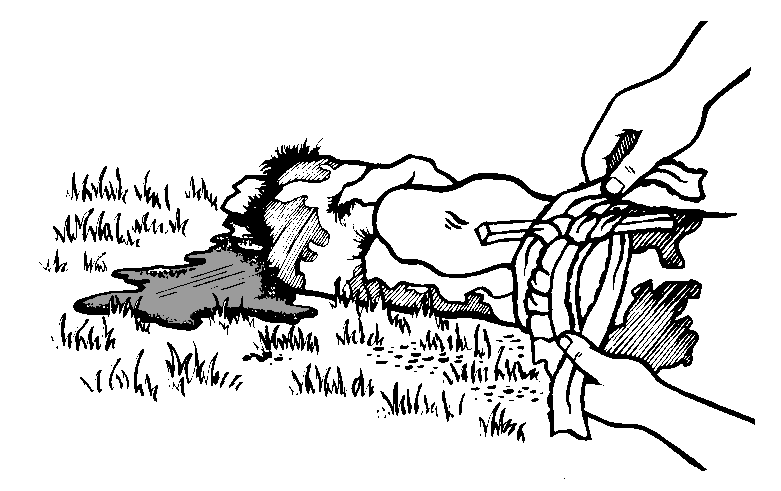 FIGURE
4-9. TOURNIQUET APPLIED TO A LEG AMPUTATION
Do not cover the tourniquet. Leave the tourniquet in full view so it can be located quickly by medical personnel.
WARNING
Do not loosen the tourniquet once it is in place and has stopped the
blood flow. If it is loosened, the wound will start to bleed again. The additional blood loss may cause the casualty to go intoshock, which
could be fatal.
A tourniquet should only be loosened by medical personnel at a medical treatment facility.
4-11. DRESS AN AMPUTATION
After the tourniquet has been applied to an amputation of the arm or leg, place a dressing made of soft, absorbent material over the end of the stump and secure the dressing with bandages. The dressing will help prevent additional contamination of the wound and will help protect the wound from additional injury.
4-12. MARK THE CASUALTY
Write a "T" and the time of application on the casualty's forehead with a pen, the casualty's blood, mud, or other substance. The "T" alerts medical personnel that a tourniquet has been applied.
Continue to monitor the casualty and treat for shock.
If possible, practice applying a field dressing, pressure dressing, and tourniquet to a simulated casualty. If you are using a person as the simulated casualty, do not tighten the pressure dressing and tourniquet enough to seriously interfere with blood circulation. Have another person score you performance using a performance checklist
If possible, practice applying a field dressing, pressure dressing, and tourniquet to a simulated casualty. If you are using a person as the simulated casualty, do not tighten the pressure dressing and tourniquet enough to seriously interfere with blood circulation. Have another person score your performance using a performance checklist.